Table of Contents
Events trigger actions. Actions perform the work of the application by making adjustments to the user interface or interacting with outside applications.
Every event has a name which is used as the matching trigger for actions. Events may also contain an optional data payload and a symbolic description of that payload in what is referred to as a format string. Events can be directed at a particular model element, contain position information to target a particular screen region (such as a press event) or be completely independent of the display state of the user interface.
Events fall into three broad categories:
Standard Input Events are generic input definitions and are pre-defined within Designer and as such are not user defined events. These events represent expected user interactions such mouse or touchscreen press, release and motion as well as keyboard input. There are other standard input events defined for managing UI state changes such as focus management, screen change notification and application state management.
These event definitions and their data payloads are defined in the header file
iodefs.hand are also listed in the appendix Appendix D, Standard Event Definitions.UI Events are events that are defined to be used just within the context of the user interface. UI events are considered user events as they are custom to your application and you define them for your specific application needs. In general these events are generated from within the application in order to trigger some additional follow up behavior within the Storyboard application. Examples of this include the events generated in response to timers or animations. User defined events that are sent within the application are also considered as UI events, for example an application might define its own
PowerOnorPowerOffevents that it sends when the user initiates a touchscreen interaction. In the , these types of events are labeled Self Events.External Events are also user events. These are events that you defined for the purpose of communicating information into and out of the user interface. These events will frequently represent the application programming interface between the user interface and the rest of the system. Due to the shared nature of these events, between the UI and the system, these events deserve a special level of diligence in their design as it requires a greater effort to change their meaning or data payloads once they are put to use. In the , these types of events are either labeled Incoming or Outgoing Events.
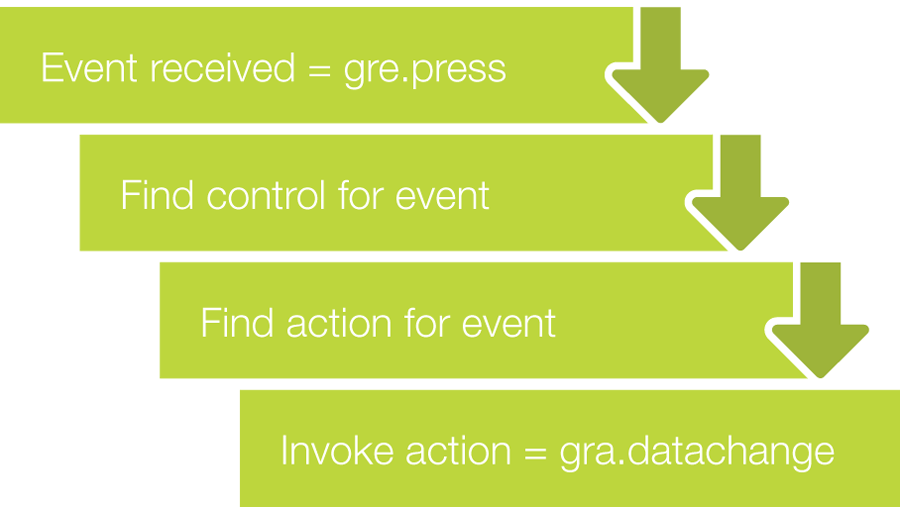
The delivery of an event in a Storyboard application is what will trigger the
execution of actions which, as we have mentioned, causes visual and behavioral changes
in the application. Actions receive an association with an event when they are bound to
a particular model element in the application hierarchy. For example the way in which a
gre.press event triggers a Data Change action might look
something like the following:

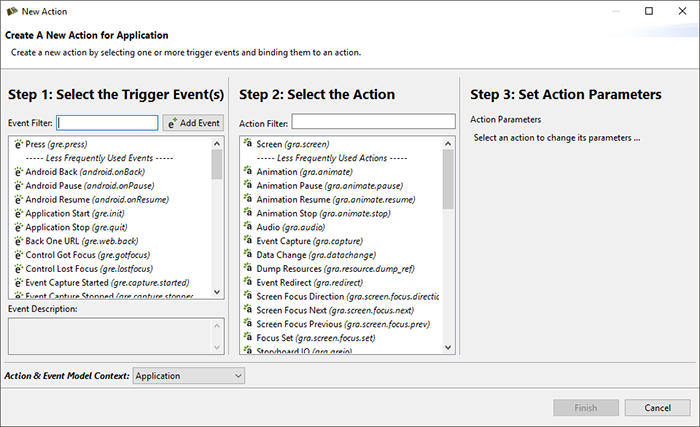
To add actions to your application model, right-click the application and select > menu to open the dialog.
 |
This dialog presents a three panel dialog containing the three pieces of information that you require to bind an action.
- Trigger Event
-
This panel allows you select one or more events that you want to trigger actions. By default the list is populated with the standard events, but you can add your own user defined events as well at this point. Select the button to open the dialog. In this dialog you can enter in the name of your new event and provide some optional descriptive information about the source and payload of this event. Once a new event is created it will be added to the list of available events shown the dialog. All user defined events are stored in the project relative file
events/custom.evt. This text file uses a simple formatting and can be edited directly if many user events need to be added all at one time.Note
The name of an event is what is used to trigger actions, so event names should be carefully considered. All of the standard Storyboard event definitions are placed within a
gre.prefixed namespace. As you develop your application and introduce your own custom events, you should take care to organize your events in a manner that allows them to be clearly identified and associated with specific functional domains within your overall product. - Action
-
The second panel in this dialog allows you to select one or more actions that you want to invoke when the triggering event is received. There are many different types of actions that you can draw from.
- Action Parameters
-
This third panel's content will change based on the action selection and presents a user interface for adjusting the parameters of the selected action. If multiple actions are selected, then this panel will only show the parameters for the first action selection made, but all of the selected actions will be bound. The action arguments are presented for convenience in this dialog and can always be changed or reconfigured using the .
In order to complete the dialog at least one event and one action must be selected. The resulting actions are going to be bound to the selected model object, or if multiple objects were selected then bindings will be created for every one of the selections. You can verify that the action binding is being performed on the intended object by looking at the information at the bottom of the dialog.
After an action is bound to a model object, that action will show up in the underneath the model object it has been bound to and will also be visible in the when the model object is selected. The action's properties can be changed and re-configured by selecting the action in either of these contexts and then using the . For information about specific action parameters and properties, please refer to the Storyboard Action Definitions Appendix.
If you have mistakenly bound an action to the wrong model object or have it triggering on the wrong event, it is also possible to change this binding information from the by double clicking on the field you want to change and making the required adjustment. Similarly you can also change the action that is being invoked when an event is matched by double clicking and selecting a new action from the drop down list. When the action is changed as many of the action parameters as possible will be transferred to the new action from the old action, but you should take care to double check your parameter settings when making this type of adjustment.
In general event processing proceeds starting with control actions and working upwards through the model until the event is finally matched by application actions. Which control(s) start this process depends on the type of event that is being processed.
-
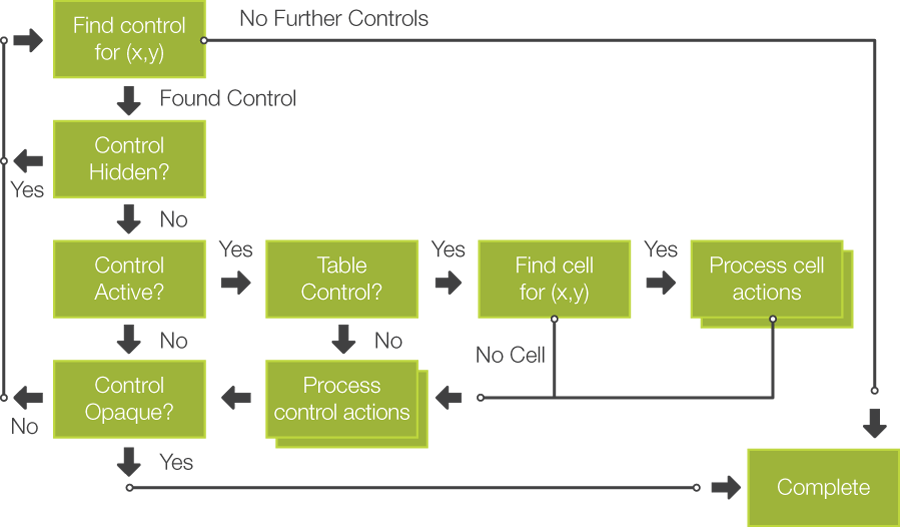
Pointer type events such as press, release and motion are directed at a specific location within the display. For these events the controls that will be selected as the starting point for processing will be based on an intersection of the event position and the control location. Multiple controls may intersect with the event and as such the control list for processing will be ordered in the same visual front (first) to back (last) order. Events that are not visible or not active are not included in this processing.
The controls that are matched by pointer events also have the potential to become the newly focused controls if they have enabled a focus index property (off by default). Focus controls are used for non-targeted events that do not have a specific display location.
-
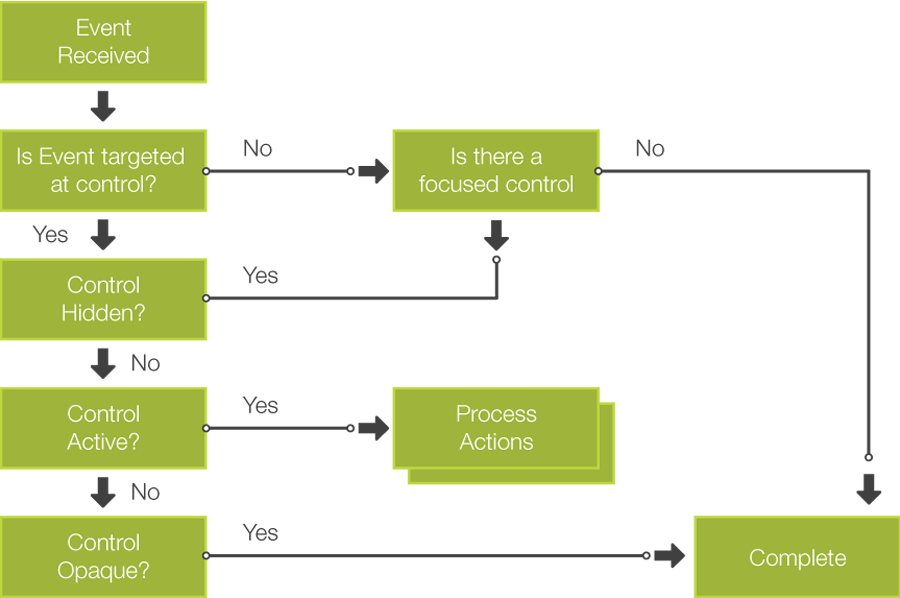
Targeted events, which is what most user defined events will be, do not have specific screen display information and do not use an intersection rule to pick the control for processing. Instead these events will start matching at the currently focused control on the current screen if one exists. If no such control exists, then there is no control starting point and the event processing will start at the current screen.
-
Targeted events. These are events that have a specific model target provided within the event payload. In these situations, the control list will be created based on what the target indicates. If the target is a control then it will be used to start processing.
If there is a list of controls then the event processing will to proceed through the list with the events being processed sequentially: control, control's group (if applicable), control's layer. If there is an event to action match on a control (or group, or layer) and the properties on that model object indicate that the processing should stop, then event processing immediately passes up to the screen or application level with no further controls (or groups or layers) being processed. If through this control selection process, there is no applicable list of controls, then the processing of the event will start at the currently displayed screen and then move to the application.
The following diagram outlines the processing of an event that contains position information:

The following diagram illustrates the flow for an event which does not have positional information:
