Table of Contents
When exporting to an iOS Device all related files and available plugins are packaged into a single application for the device. Since this is the case there is no need to set up environment variables or specify runtime options on the target, since this will all be done in Storyboard Designer when you export the application.
To configure an iOS device to run your apps you need to set up a few things from Apple first:
Xcode
iOS developer account
A code signing certificate
The device ID of the Apple products you will be running on
The identifiers of the applications you will be making
A provisioning profile
Xcode no longer includes the command line tools and need to be downloaded separately from the app store.
To obtain a developer account you will need to go to https://developer.apple.com, click on iOS Dev Center, then click register. After that follow their step by step instructions and you will be a registered iOS Developer.
Log into your iOS Development account and click on the iOS Provisioning Portal link at the right hand side of the page. In your Provisioning Portal, click Certificates in the left tab bar. If you do not have a certificate, there will be an option to submit one. To do this you will need to make a Signing request. You can do this by launching Keychain Access, located at /Applications/Utilities. Then go to Keychain Access > Certificate Assistant > Request a Certificate From a Certificate Authority. Enter your email address and your name, then select save to disk. Once that has been generated, go back into the certificates page of your provisioning profile and submit it for approval. After the certificate gets approved, download the file and open it, and it will be added to you keychain access.
Log into your iOS Development account and click on the iOS Provisioning Portal link at the right hand side of the page. In your Provisioning Portal, click Devices in the left tab bar. Click the add devices button at the top right of the page. Here you will need the device's name and Device ID. To get these connect the device to your computer and find it in iTunes. With the device selected click on the device's serial number, and it will switch to the Device's Identifier. Then click Edit > Copy Identifier (UDID). Now return to your Provisioning Portal, paste the identifier and enter the name of the device.
Log into your iOS Development account and click on the iOS Provisioning Portal link at the right hand side of the page. In your Provisioning Portal, click App IDs in the left tab bar. For this section we recommend you set up a generic App ID and have it accept all of you applications. However if you wish to enable other iOS like Push Notifications or In-App Purchase, you will need to make an ID for that individual app. To create a generic App ID, click the Add New App ID Button. Now enter a description of the app the Id will match with, e.g., "Application Development ID". Now enter the Bundle identifier. If this is a generic App ID simply type "*". If this is for a specific app, enter the app's identifier. For example, "com.cranksoftware.storyboardApp". Now click submit to go back to the previous page, find the App ID, and configure all of the options that this specific application needs.
Log into your iOS Development account and click on the iOS Provisioning Portal link at the right hand side of the page. In your Provisioning Portal, click Provisioning in the left tab bar. Click the New Profile button. Create a name for this profile. Select the certificates that will be used by this profile. Select the App ID that will be used by this profile. Select the Devices that will be used by this profile. Once this is completed, download the YourProvisionProfileName.mobileprovision file and save it to your computer. When you are exporting your Storyboard application, you will need to tell Storyboard where this file is.
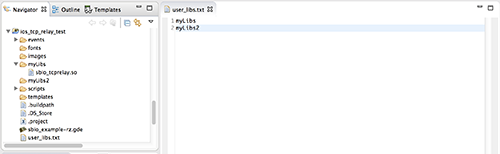
Users can also add additional libraries that aren't included in the runtime to an exported iOS application. Similar to Android, Storyboard needs to know about them beforehand so that we can pass them through the code signing process. To do this, create a text file called user_libs.txt that contains any folder names as strings that lead to added libraries that we need to check for signing. The folders should be placed at the project root. This text file should also be placed in the root of the project. A valid setup looks like this:
Now that your libraries have been signed and are available for use, if you need to access them through Lua you can do so using the helper variable gre.SCRIPT_ROOT. You can look at the generated .app file to determine the script root relative path to your library folders, which will be located at the root of the .app folder. That path needs to then be appended to the package.cpath variable in Lua using a semicolon. In the above example, it would look like this:
