After an application has been created, it is a good idea to run it through the simulator to validate the runtime behaviour before exporting the application to a Storyboard Embedded Engine deployment file. The simulator is a host-based instance of the Storyboard Embedded Engine and should exhibit the same operational behaviour as the target, though there may be differences in the level of performance obtained because of the different CPU and graphic characteristics.
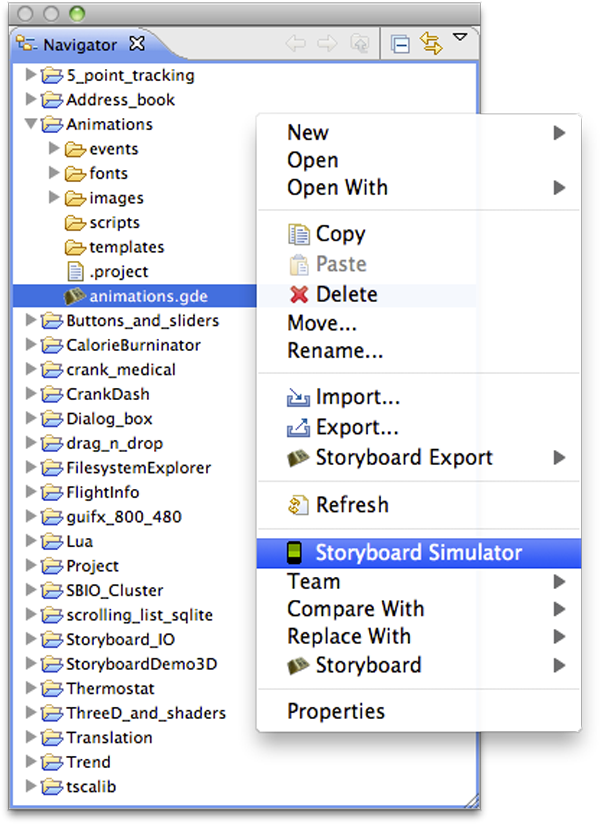
Simulating a Storyboard application is a straightforward process. From the Navigator view, right-click the Storyboard designer file (*.gde) and select the Storyboard Simulator option.
Alternatively, you can select the Storyboard Simulator option from the toolbar ...
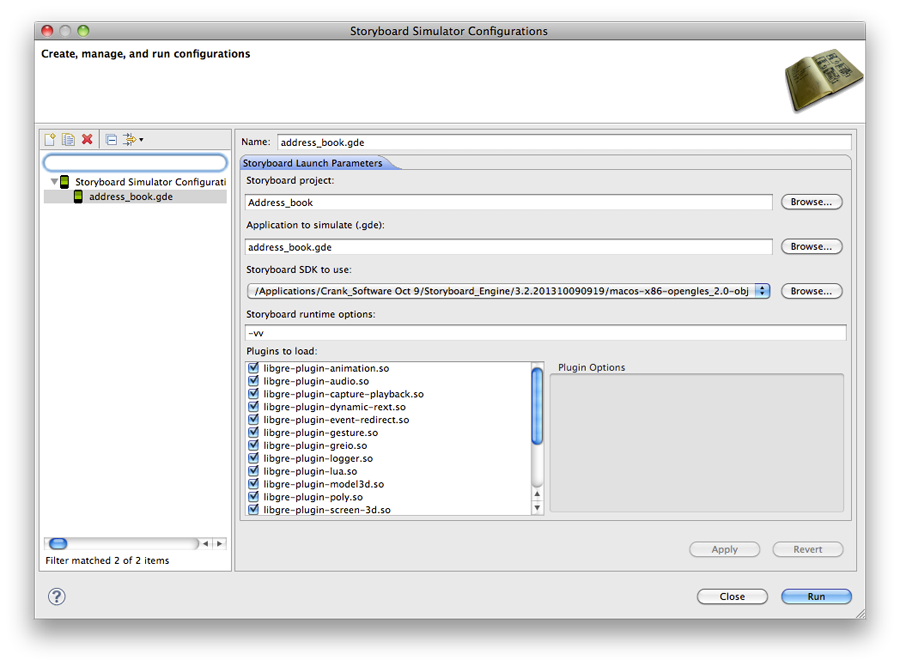
or the Storyboard Simulator Configurations from the toolbar ...
which will allow you to customize how the simulator is launched.
The options include configuring which plug-ins are to be loaded by the simulator and what level of verbosity should be used to run the simulator.
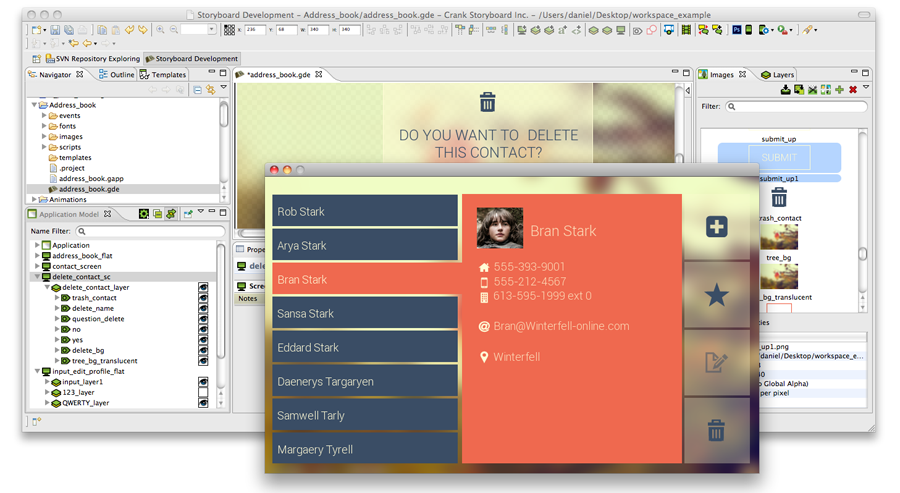
When the simulator is launched it will perform an automatic export to a Storyboard Embedded Engine to a temporary directory and run the application in its own window on the host system.
Export a Storyboard Embedded Engine configuration from the main menu using File > Export. This launches the export wizard.
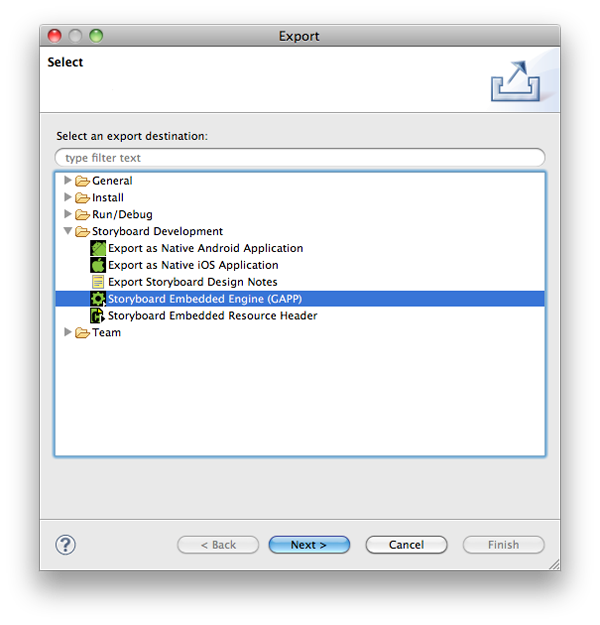
Select the Storyboard Embeded Engine (GAPP) option and click Next. Select the Storyboard application file (*.gde) that you want to export and the output location that you want to export to.
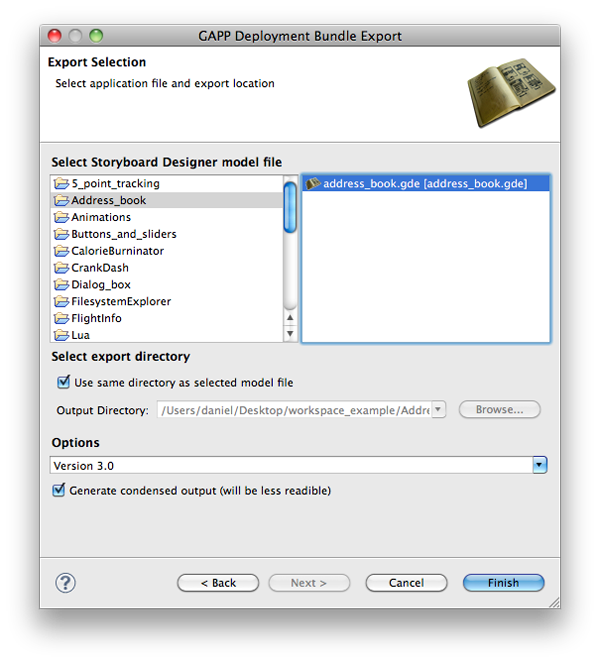
Select Finish to create the specified directory, create a Storyboard Embedded Engine (*.gapp) runtime file, and export the resources from the images, fonts, and scripts directories.
It also possible to perform headless exports of the Storyboard Design files to the Storyboard Embedded Engine files from a command line or scripting environment.
					PATH_TO_INSTALL/Storyboard_Designer/storyboard/Storyboard -application
					com.crank.gdt.ui.gappexport model=<PathToGDEFile[,PathToAdditionalGDEFile,...]>
					output=<PathToGAPPFile>
Where the model is the full path to the Storyboard Designer model file. In
the situation where multiple GDE model files are being joined together it is a comma separated list of model files where the
first model file will be used for the start screen and the remaining models will be used for additional content. The output
parameter specifies the filesystem path where the Storyboard Engine file will be created and the directory containing that file
will be used to for the additional resource directories (scripts, images and fonts).
Exporting as an Android application will create an Android package that is suitable for use on Android devices. The packages generated will only work on devices running Android version 2.3.3 and above.
To create an Android package, select File > Export to start the export wizard:
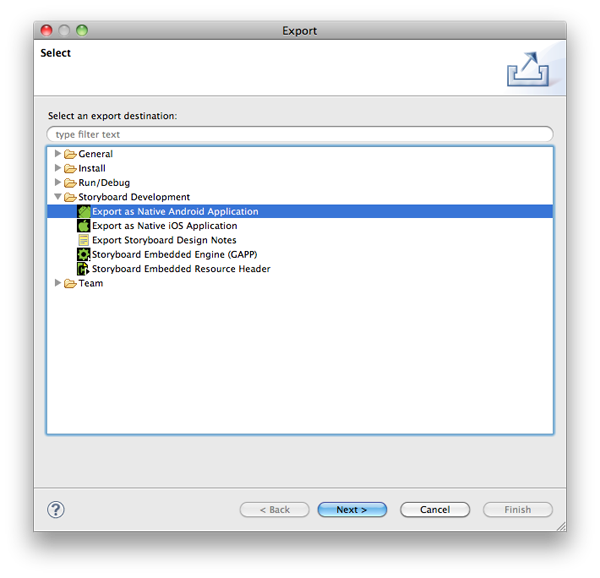 |
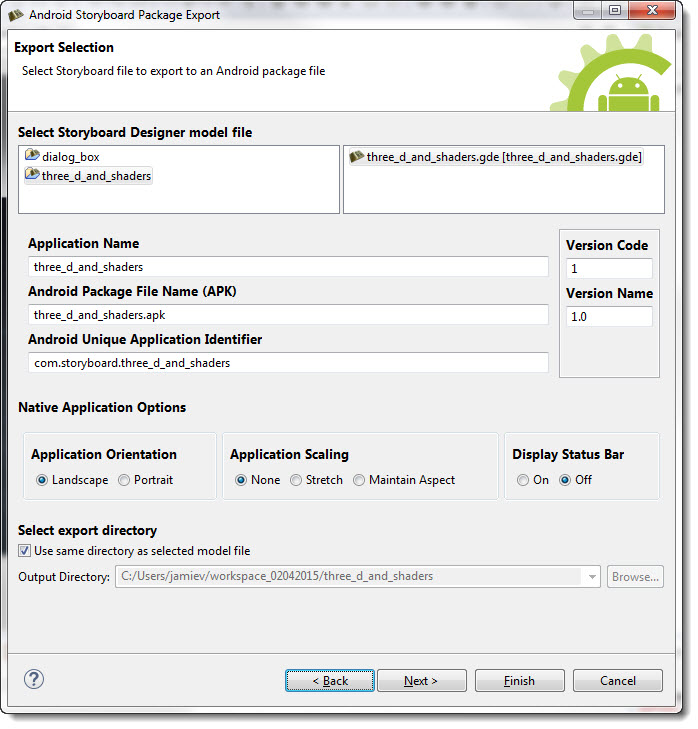
Select the Export as Native Android Application option and click Next. From the export file selection dialog, select the Storyboard application file (*.gde) that you want to export. Choose appropriate names for the application name, android package file name, and the package name. Select the directory you want to export to and options for application orientation and fullscreen. For Android devices version 4.4 and newer, the fullscreen option uses Android's sticky immersion fullscreen.
Note
Currently, without rooting an Android device, there is no way to disable the bottom bar for some Android 3.0+ devices.
 |
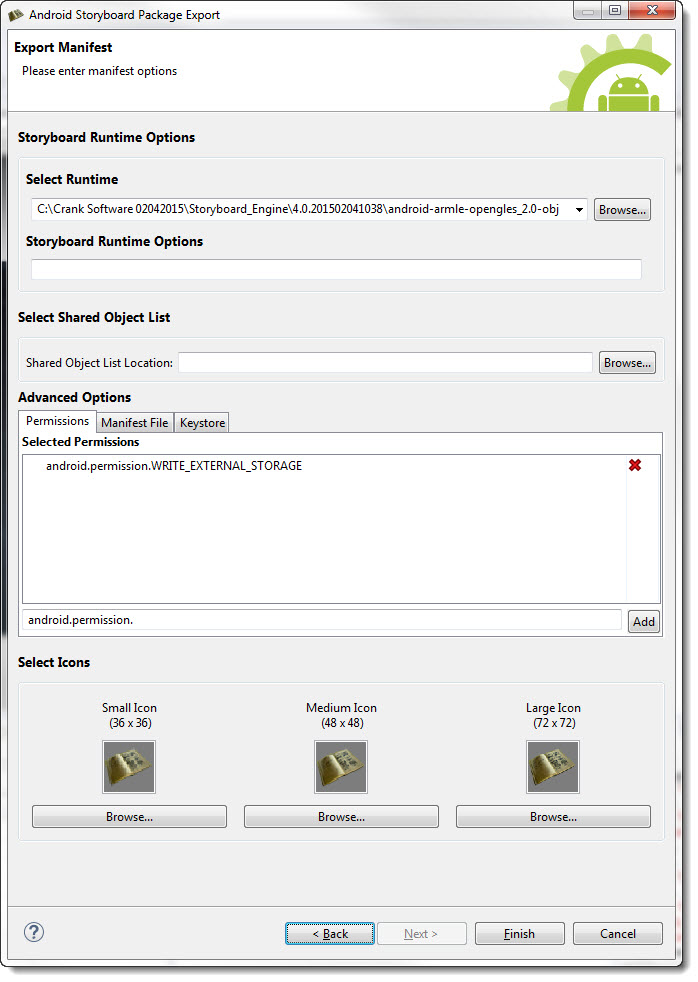
Click Next to bring up the a page with options for choosing a specific Storyboard Engine to use, setting Storyboard runtime options (see Storyboard Engine Options for list of available runtime options), and selecting the icons for the application. Click the tabs under Advanced Options to modify the default Permissions, Manifest file or Keystore settings (optional). If you don't need to alter the settings, just click Finish to use the defaults.
 |
Select Finish to create the Android application package file (APK) in the directory specified. To transfer this application package to an Android device, simply copy the package onto a USB or SD card.
Storyboard makes it simple to translate and internationalize the text content of your application. Dynamic text content is treated the same as any other dynamic content that is rendered to the display. Within the text render extension, the translatable content should be associated with a variable. Any changes that occur to that variable, will trigger a screen re-draw to occur if that variable is being used in the current display.
Changes in string content is automatically reflected, making the translation activity significantly less labour intensive. To apply the translated content to the application, simply update a number of data variables with the appropriate UTF-8 encoded text string.
Two examples of translation are provided in the Storyboard samples. To further understand the internationalization process, be sure to check out translation and thermostat Storyboard samples available via File > Import > Storyboard Sample.
In some circumstances, most notably with non-latin character sets, it may also be a requirement to dynamically change the fonts being used to map to an alternative font that provides the appropriate glyph support for the characters being rendered. Additionally it may be that a change in translated text requires additional attributes to be adjusted, such as font point size or control dimensions, to accommodate the new translation. These can be adjusted as a straightforward data change to a dynamic variable. In all situations the UI will automatically refresh to show the new content.
Storyboard provides two editor functions that allow translations to be quickly prototyped in the context of the design environment.
The Create Translation toolbar item scans
through the application, identifies all of the bound text variables that are
used, and extracts them to a comma separated (csv) file that contains the
Storyboard variable key and the translated text string. By default, this
file is saved in the translations directory of the project.
This file can serve as the basis for performing a dynamic load of translated
content or can be used by designers to ensure that the UI is appropriate for
different language configurations.
The Apply Translation toolbar item scans
the translations directory of a project for suitable
translation files and presents a dialog that allows the user to immediately
change all of the variable definitions in a project to the values declared
in the translation file. This feature allows developers a quick way to
preview their content in different language configurations.
We have explored two tools for editing and creating translation content. The recommended tool is Open Office Calc as it has the capability to character encode (csv) files in UTF-8. Some applications, such as Microsoft Excel are unable to save (csv) files using UTF-8 character encoding. We discuss two methods to create UTF-8 character encoded (csv) files. One solution is more straightforward and uses Open Office Calc and the other is a solution using Microsoft Excel and Notepad.
Open Office Calc
It is free and can be downloaded from www.openoffice.org.
Using Calc, open a spreadsheet file via File > Open... (note: this can be a spreadsheet created using Calc or Excel) .
Save the file as a (csv) file via File > Save as... > Text CSV(.csv)
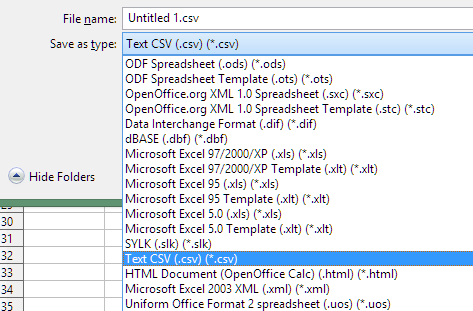
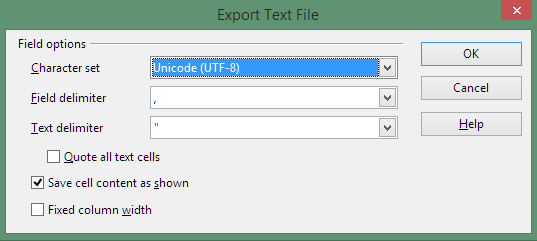
When saving a (csv) file, Open Office Calc will ask which character encoding you wish to use for the file, be sure to choose Unicode(UTF-8).
Microsoft Excel
The solution to create UTF-8 encoded (csv) files using Excel is to create a tab seperated file in Excel by saving as a unicode text file then replace the tabs with commas in Notepad, save the file and change the file extension to (csv) with encoding set to UTF-8.
Save the spreadsheet in unicode from within Excel File > Save As... > Text CSV (.csv)
Open the .txt file from within MS Notepad
Select one of the tab characters and copy the character (ctrl+c)
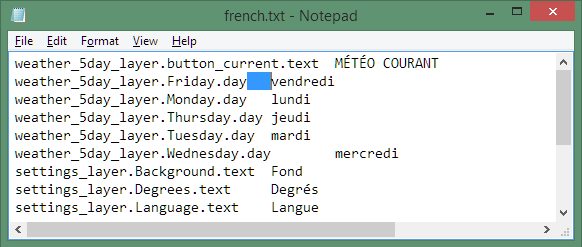
Using the Replace tool File > Save As... > Text CSV (.csv) or (ctrl+h), paste the tab character in the "Find what" field (ctrl+v) and insert a comma in the "Replace with" field.

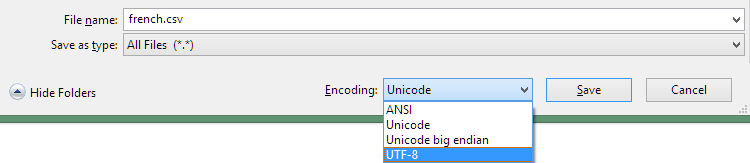
Save the file File > Save As... > All Files (*.*), change the file extention from .txt to .csv and be sure to change the encoding in the drop down menu to UTF-8.
Now the resulting (csv) file is UTF-8 character coded and can be opened from Excel to ensure that the data is as correct. Do not save the file from Excel or the UTF-8 encoding will be lost.
More information about the Microsoft Excel solution can be found at https://help.salesforce.com/apex/HTViewSolution?id=000003837&language=en_US.
Storyboard provides the ability to leverage 3D capable OpenGL ES 2.0 hardware to render and display 3D objects and also create custom shaders to modify and adjust the display of controls.
Note
This functionality is only available for OpenGLES rendering systems.
A complete description of OpenGL ES 2.0 shaders is beyond the scope of this document and is better treated in detail in the OpenGL ES Shader Language specification. This document will focus on the shader programming aspects that are relevant to Storyboard developers.
Note
At this time, shader effects are not visible within the tool and are only visible when using an OpenGL based runtime or simulator.
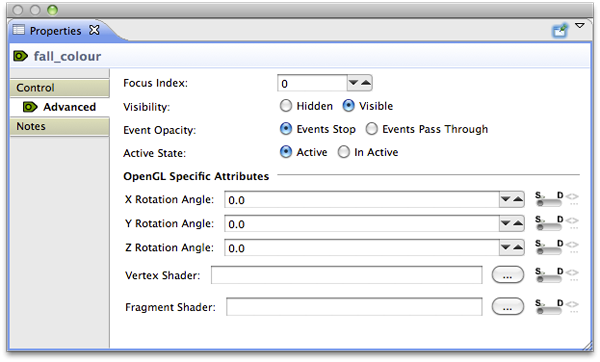
Storyboard provides the ability to hook in a fragment shader and/or a vertex shader to be associated with the rendering of a control element. The shaders are provided as files and are associated with the control through the Advanced tab of the control's properties. Here you can select either a specific file for either shader or bind the shaders to variables that will resolve to files in the project at runtime.
The shaders will be applied to the resulting texture that is the outcome of having all of the current render extensions applied to it. That is to say that the control is effectively rendered as it would be in the normal sense, but the final result is provided as a texture to the shaders to manipulate before it is finally rendered to the display.
Shader programs have three types of variables: attributes, varying, and uniforms. Attributes are passed into the shader from the render manager and contain data such as vertex locations, and texture coordinates. Varying variables are calculated in the vertex shader and passed into the fragment shader after being interpolated based upon the location of the fragment. Uniforms are also passed in from the render manager, but are typically used for purposes other than storing the geometry being rendered, for instance, containing a global alpha value which can be used to blend an entire model.
When writing a shader program, it is important to follow the conventions for attributes and uniforms established by the render manager. Otherwise, it will not be able to pass in geometric data and nothing will be rendered. Below is a minimal vertex shader which matches the functionality of the built in vertex shader for images.
attribute vec4 myVertex;
attribute vec4 myUV;

varying vec2 vtex;

uniform mat4 projMatrix;
uniform mat4 mvMatrix;

void main(void)
{
    gl_Position = projMatrix * mvMatrix * myVertex;
    vtex = myUV.st;
}
The myVertex and myUV attributes contain vertex and texture coordinates respectively. The projMatrix and mvMatrix contain the projection and modelview matrices, which are used to transform the input vertex position, which is then assigned to the gl_Position for the vertex. The varying vtex is used to hold the interpolated texture coordinate which is then passed to the fragment shader. The render manager looks up myVertex, myUV, projMatrix and mvMatrix by name when it loads the shader, so these names must be used in any custom vertex shader. The varying name must match between the vertex shader and the fragment shader.
Below is a fragment shader which matches the functionality of the built in fragment shader for images, and shows the minimal code required to work with the Storyboard render manager.
#ifdef GL_ES
precision mediump float;
#endif
uniform sampler2D sampler2d;
varying vec2 vtex;

void main (void)
{
    gl_FragColor = texture2D(sampler2d, vtex);
}
The initial precision declaration is required by OpenGL ES, but not supported by OpenGL, and is set with a preprocessor conditional. The sampler2D uniform controls which texture unit is used when sampling a texture. The render manager only supports a single texture. The varying variable is interpolated based upon the vertex values in the vertex shader, and is passed into the sampler to look up the color at the fragment location. This is assigned to gl_FragColor and becomes the fragment color.
It is also possible to pass data from Storyboard variables to shader uniform variables, subject to two constraints: the model element for the variable must be the control for which the custom shaders are being used and the variable type must be float. When the custom shader is loaded, a list of all of the uniforms present is created. The name of each uniform is then compared to the list of variables attached to the control, and if a matching name of the appropriate type is found, it is used to the set the value of the uniform when the control is rendered.
As an example, consider animating a custom shader to do a simple fade-in based upon the value of a timer. First, create a variable of type float called "current_time" for the control with the custom shader. Then create an animation using the animation timeline which changes the value of the variable from 0.0 to 1.0 over a few seconds, and create an appropriate trigger for the animation, for instance a mouse press event. Then, edit your fragment shader as follows:
#ifdef GL_ES
precision mediump float;
#endif

uniform float current_time;
uniform sampler2D sampler2d;
varying vec2 vtex;

void main (void)
{
    gl_FragColor = texture2D(sampler, vtex) * current_time;
}
When the control is rendered, the value of the uniform current_time will be set from the value of the control variable current_time, which will cause the color read from the texture to be scaled from 0.0 to 1.0 over the duration of the animation, causing a fade in effect.
The OpenGLES 2.0 render manager now supports compressed textures on supported hardware. The formats supported are PVRTC1, both 4BPP and 2BPP. This compression format is supported on most PowerVR graphics chipsets.
To determine if the chipset supports it, running Storyboard with a verbosity level of 6 (-vvvvvv_ will print out, on startup, the GLES extensions supported by the chip. If PVRTC is supported, you will see GL_IMG_texture_compression_pvrtc in the extension string list.
Storyboard will manually decode these images if the runtime being used does not support them. Should a project that was running on a PowerVR chip and using compressed images be run on a SW runtime that does not support them, the images would still decode and render correctly, just without HW acceleration.
PVRTC provides a 8x improvement in memory size (A 1024x1024x4 BMP would take 4MB of memory, whereas a PVRTC image would take 512K)
Compression tools can be found at:
Storyboard Designer allows developers to create re-usable design components, templates, that can be shared among multiple projects.
A template is created by selecting a Storyboard Designer model element in either the Storyboard editor or the Application view and right clicking and selecting Create New Template. A dialog will prompt for a template name, description, and the name of the file to save the template.
Templates may be composed of a selection of one or more controls or one or more groups. If several controls considered together provide a logical functionality, then it is generally a better idea to encapsulate them within a group and create a template from that group rather than template the multiple controls together. Templating a group more easily allows the functionality to be encapsulated so that the template can be re-used several times within an application. When templating several controls, it is possible to template content originating on different layers. In this situation the position used for the control is going to be the position relative to it's parent layer and not the position of the control relative to the other controls in that particular screen context where the parent layer offset may be adjusted or different from screen to screen.
With any content being templated, the template generator will scan the selected model objects (controls and groups) and any child model objects and include over any variables, actions and render extensions that are directly referenced. This scanning will also attempt to identify external resources such as images, fonts and script files that are used by the model object being templated. This will also include any referenced animations associated with animation actions that the templated content triggers. In the situation where a Lua script is referenced, the entire Lua file will be included so for this reason it is a good idea to keep the functionality used by the content to be templated isolated into its own file.
When the template is applied if any of the templated resources (images, fonts, scripts etc) don't exist in the target project then they will be transfered from the template to the targetproject. If the resources already exist, then it is assumed that these resources should be used in place and the existing resources are not modifed.
Templates are stored in an external file independent of the project where they were created so that they can be shared and incorporated into other projects by adding them into the target project's templates directory. Once they have been added to that directory they will be parsed by the project and will be displayed in the Templates view and be made available for use. By default new templates are saved in that project's templates directory.
Sometimes in a large project it is desirable to split the application design work not only among multiple application designers, but also among multiple design files so as to minimize the amount of conflict that needs to be managed by a revision control system such as subversion, git or mercurial.
In order to facilitate working with multiple files, Storyboard maintains each design as a stand-alone free runnable application, even when it may be later incorporated into a larger unified application. This separation allows a more rapid development cycle as application developers are simulating and tuning content in a more focused environment rather than having to consider all other system functionality.
To create a unified application, the Storyboard simulators and exporters have been modified to allow them to accept multiple application files which they will merge together to produce a single unified output for the Storyboard Engine.
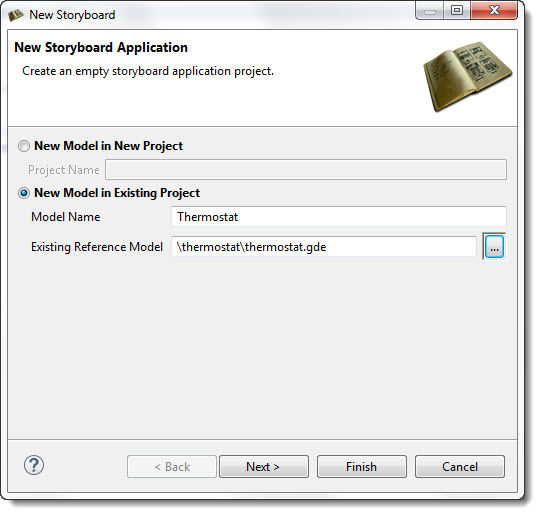
Starting a multi-file application development is the same as starting a regular project since before you can have two projects, you need to have one project. Typically the initial project created will be the master application and will host the majority of the shared resource content. This is only a convention and not a technical requirement.
Once another application is required, for example to represent a distinctly themed area of the unified application, then you will want to create another Designer application model file within the base project.
Note
Currently multi-file applications are all hosted in the same project so that they can ensure proper sharing of image, font, and script resources.
You can create another application file in several ways:
Create a blank application using: File > New > Storyboard Application ... and select "New Model in Existing Project"
 |
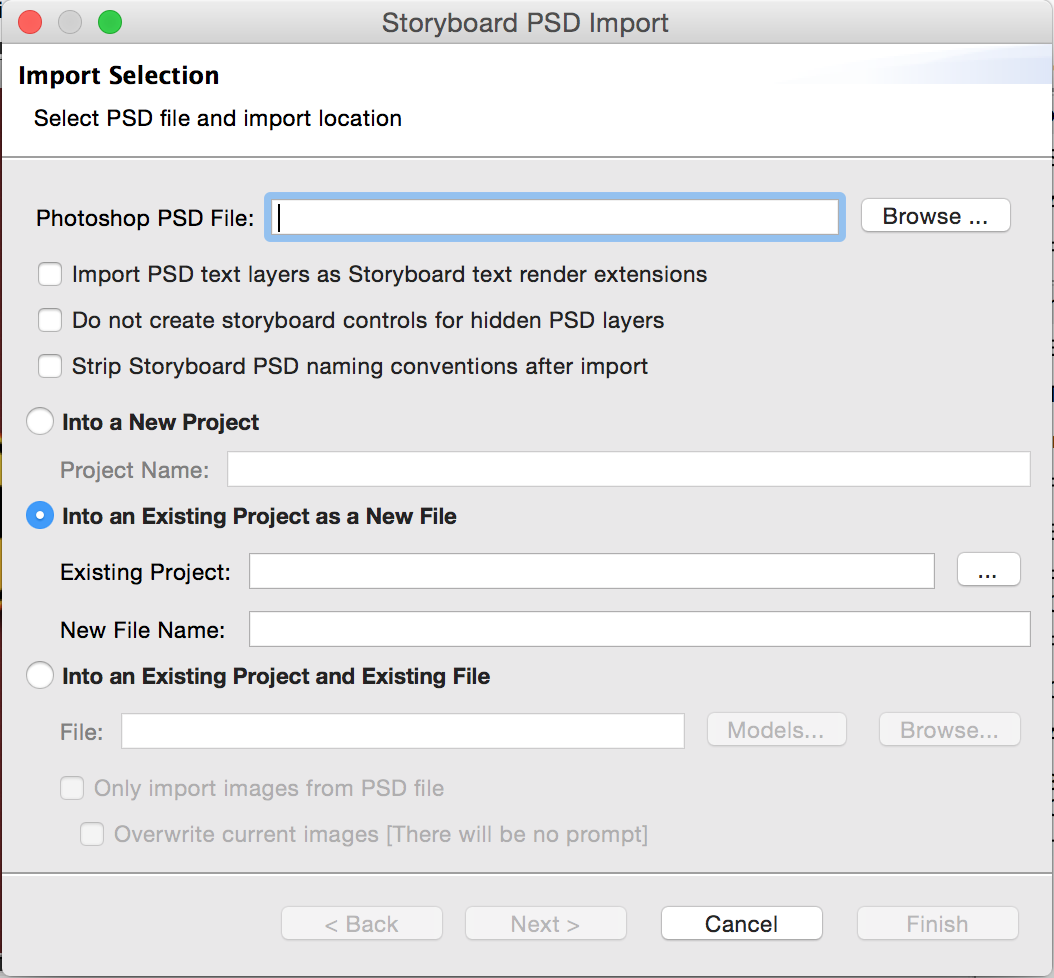
Import PSD content into a application: File > Import > PSD ... and select "Into an Existing Project as a new File"
 |
You can also simply copy and paste an existing application and rename the *.gde file to bootstrap a new design.
Doing this will result in multiple application model (*.gde) files that are all contained within the same project. They all reference the same image and script resources.
Screen transitions provide the means to tie together multiple applications to form a single, larger, unified application.
In order to indicate that one application (the source application) will be making a reference to screens in another application (external reference), the source application should list the external application in its Properties. Go to Application > Properties > External Model References
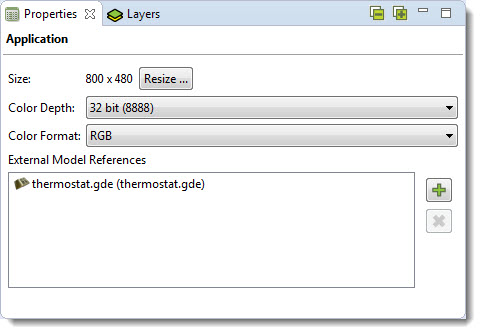 |
Once an application is added as an external reference, the screens from that application will show up in any of the Screen transition selection lists as well as any animation definitions..
Layers from any listed external applications can be added to an application by explicitly importing them using:
Add > Existing Layer > Import External Layer
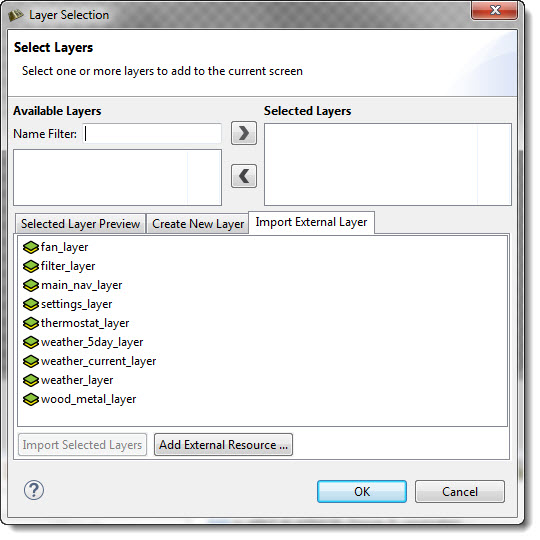 |
Once a layer is added as an external layer, then a copy of the original layer from the external application is snapshotted and incorporated directly into the source application. At this point, the external layer can be used with any source application screens just like any other layers.
Once applications have been developed, shared content leveraged, and transitions between application screens established the next step is to simulate or export the unified application.
The Storyboard simulation configuration dialog, accessed via Run > Storyboard Simulator Configurations allows multiple model files to be specified. All models in the 'Selected Models' block will be included in the application when launched.
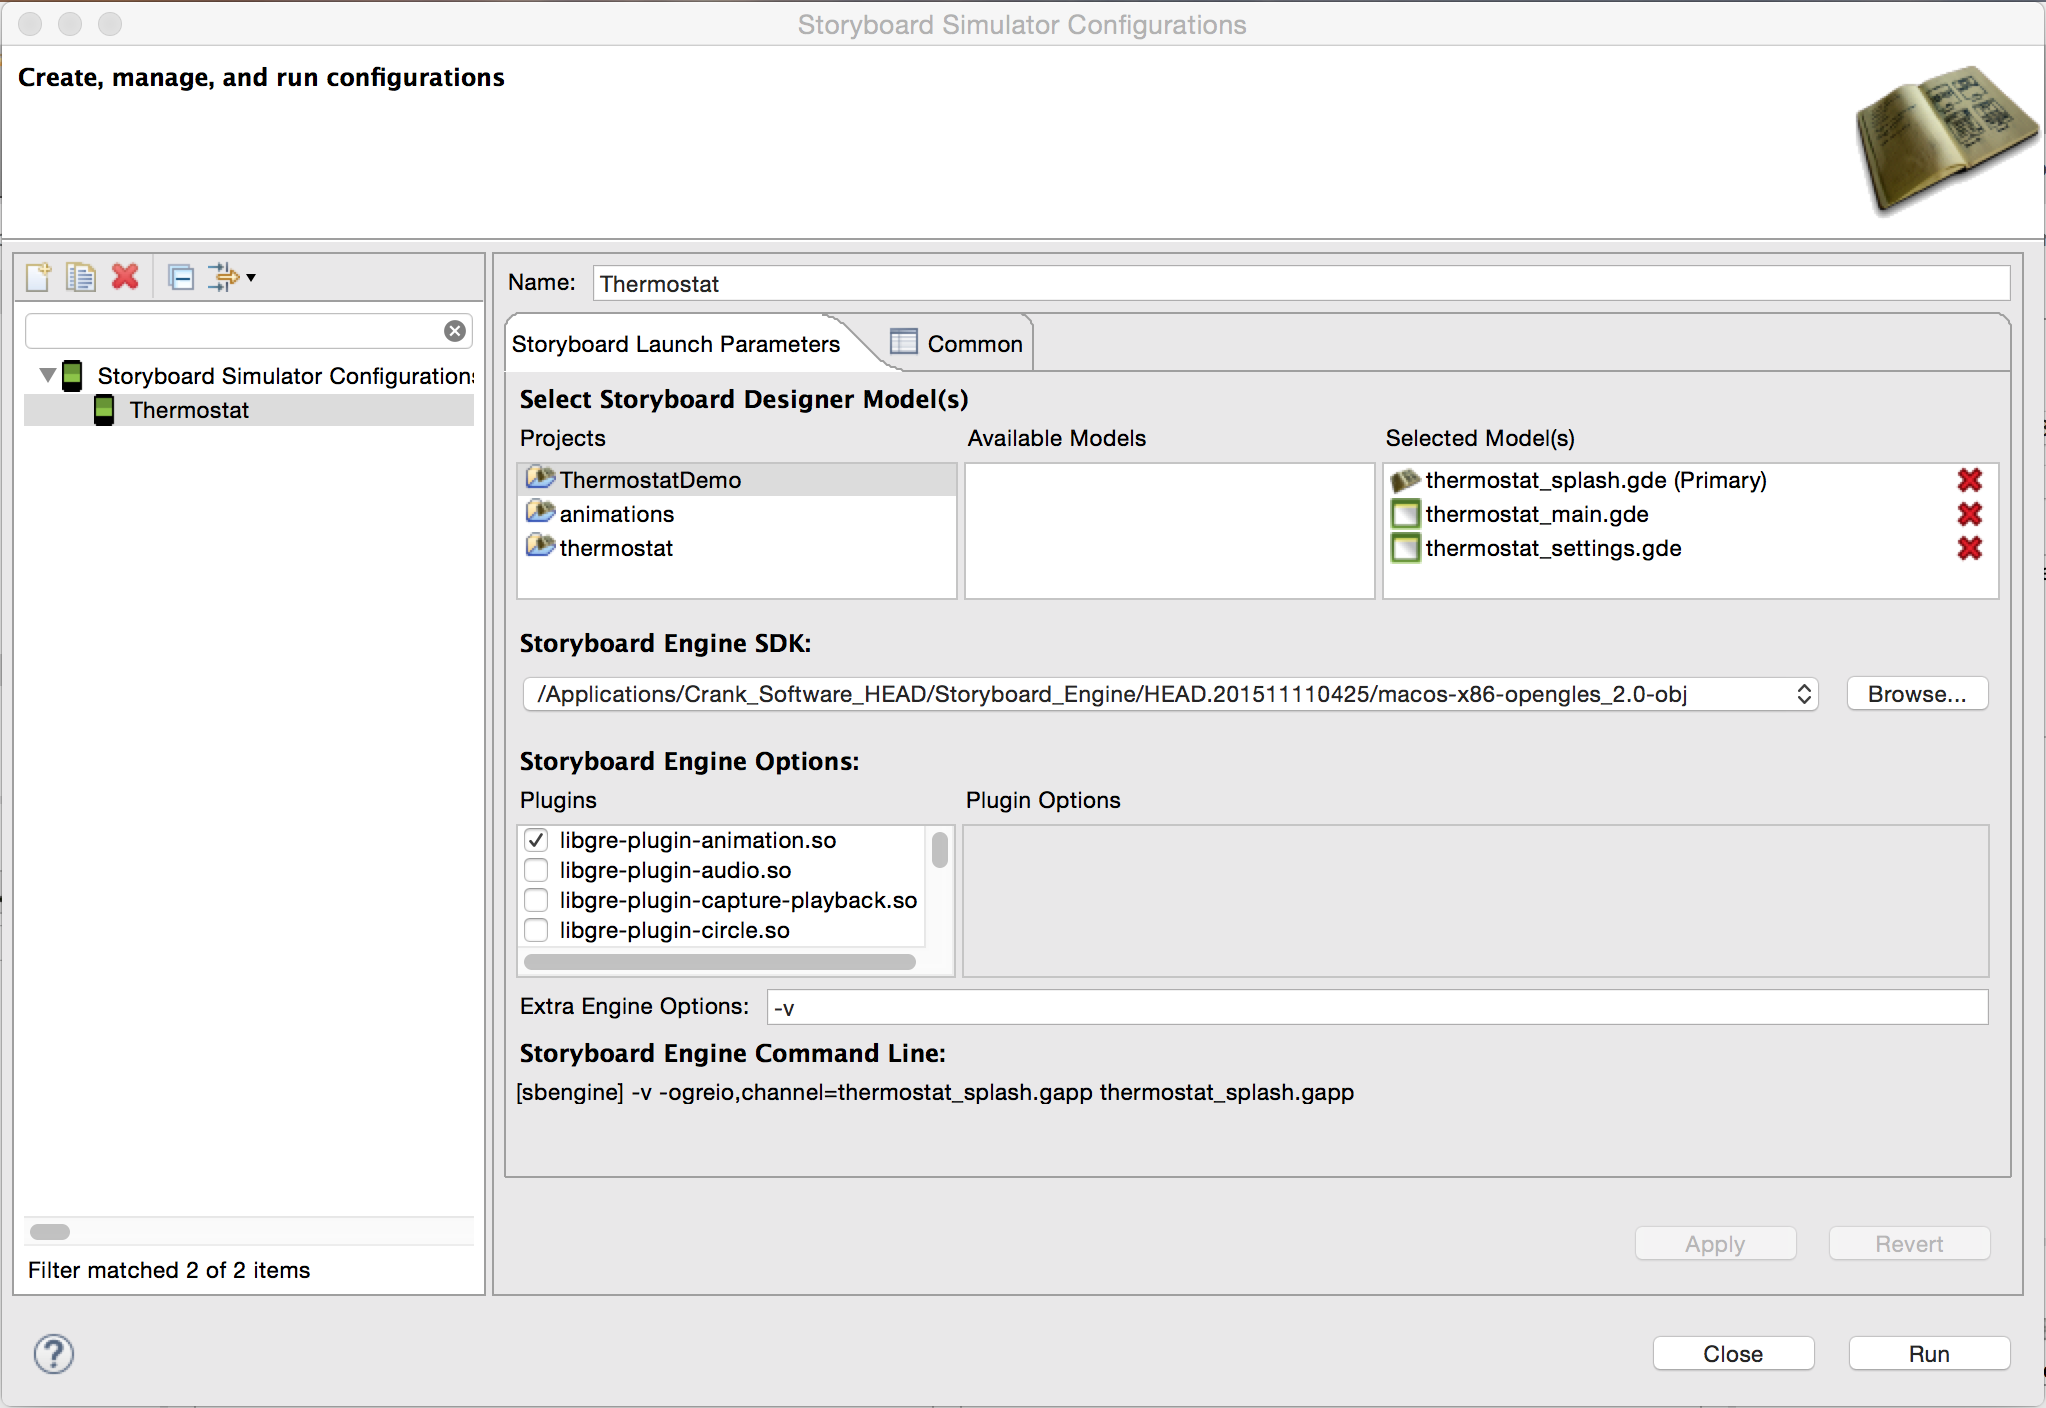 |
The first source application in the list (tagged as Primary) will be used to determine the unified application's launch screen.
Similarly exporting a runtime application to be used with Storyboard Engine, Android, or iOS targets also allows multiple Storyboard application files to be selected. In these export scenarios, you will be prompted to select the source application that should be used for the unified application's launch screen.
If there are no conflicts among the selected applications they will be merged together and converted into a single unified application and used for the user-selected operation of simulation or export.
If there are conflicts among the resources then the differences will need to be resolved before continuing with an application merge.
When multiple applications are merged together to form a unified application, the following occurs:
All layers from all applications are assembled together into a unified list of available layers. If two or more layer names are the same then those layers have their content compared. If the content is identical then the merge continues. If the layer content differs, then an error is flagged and the user will be prompted to resolve the differences and the application merge stops.
All application/global level variables from all applications are assembled together into a unified list of global variables. If two or more variable names are the same then those variables have their values compared. If the values are identical then the merge continues. If the variable values differ, then an error is flagged and the user will be prompted to resolve the differences and the application merge stops.
All animation definitions from all applications are assembled together into a unified list of available animations. If two or more animation names are the same then those animations have their definitions compared. If the animation definitions are identical, the merge continues. If the animation definitions differ, then an error is flagged and the user will be prompted to resolve the differences and the application merge stops.
All screens from all applications are assembled together into a unified list of available screens. If two or more screens have the same name, then an error is immediately flagged and the user is prompted to resolve the differences.
The external referencing of model elements relies on names remaining consistent during the application development. In some instances, if names change it may be possible for content to become unsynchronized and it may need to be resynchronized on an application by application basis.
The application properties page provides a synchronization action that scans the project for externally referenced content and then compares that content to the source reference. If there is a difference, then the difference is flagged as a conflict for resolution and the user is prompted for different ways to solve the conflict based on the nature of the issue
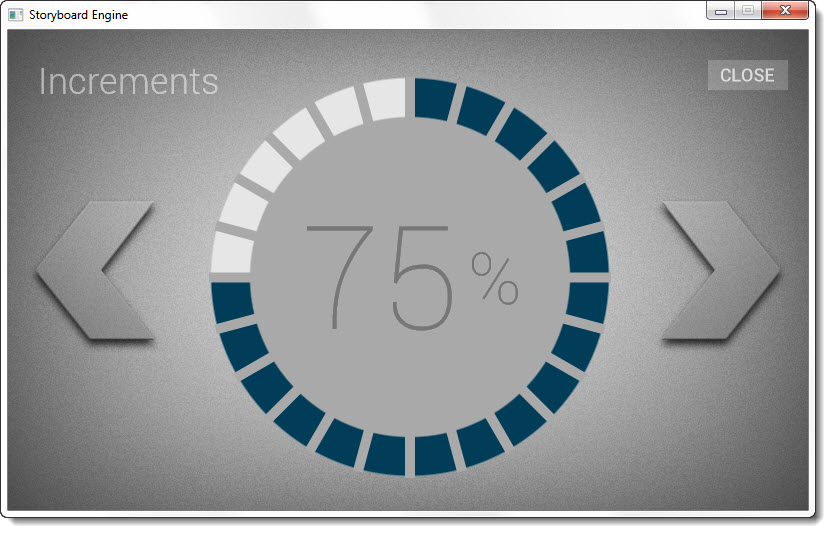
Using the circle and arc controls are an easy way to quickly add spherical objects to your Storyboard application without having to create them from scratch.
It is easy to manipulate the circle or arc controls by adding variables to their various properties. You can then dynamically change those values through Lua script or external sources. (thirdparty applications or device drivers)
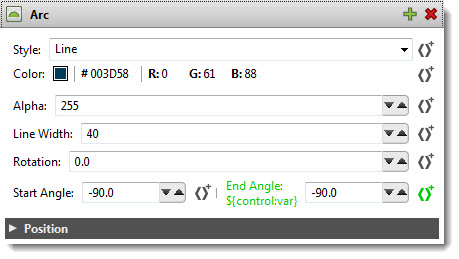
Our circles_sample pictured below is located in the Samples directory of your installation and demonstrates ways of using our arc control.
 |
9-Patch is technique used to scale an image in such a way that the 4 corners remain unscaled. The four edges are scaled in one axis and the middle is scaled in both axis. 9-Patch support has been added to Storyboard Designer to make scaling images on embedded applications easier. Instead of having multiple button images of various sizes, customers can now have one image that scales and maintains image quality.
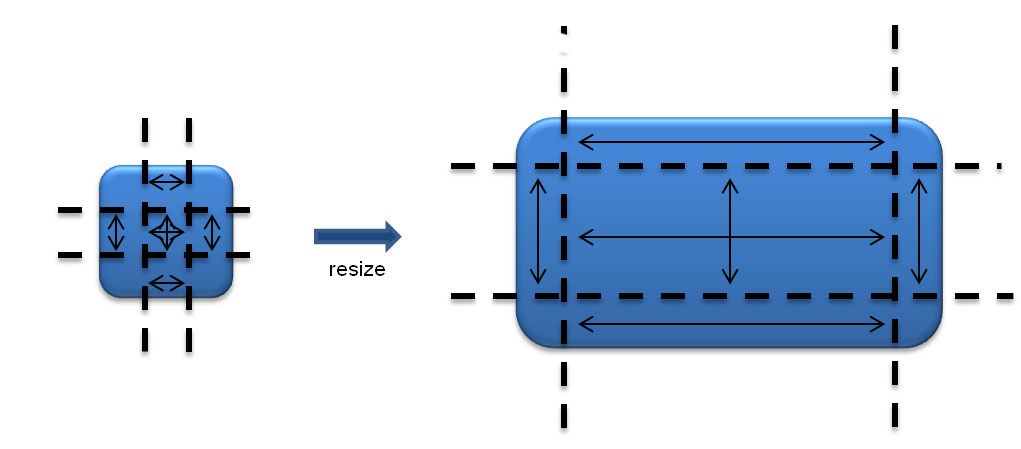 |
9-Patch images can be designed and edited directly in the Storyboard Design environment. You can quickly analyze and convert existing large or scaled image content to 9-Patch format to achieve immediate memory and runtime performance improvements.
Groups have been added to alleviate the situation of placing many render extensions in the same control. Customers now have the ability to group individual controls together. Groups can contain actions and can be manipulated using their x, y, and hidden internal variables. More information about Group data variables can be found in the "Group, Control and Layer Data Variables" section.
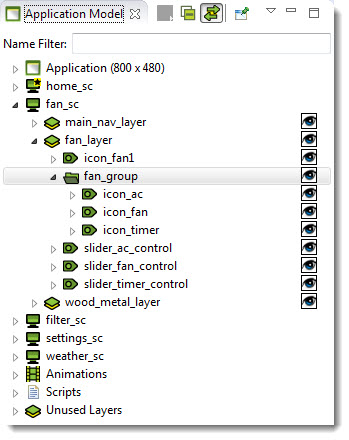
Adding groups to a Storyboard application is very straightforward. You can group existing controls together by first selecting the ones you want in the Main Editor, then right-clicking and selecting Add -> Group. This allows you to name a group and adds all the highlighted controls into that group.
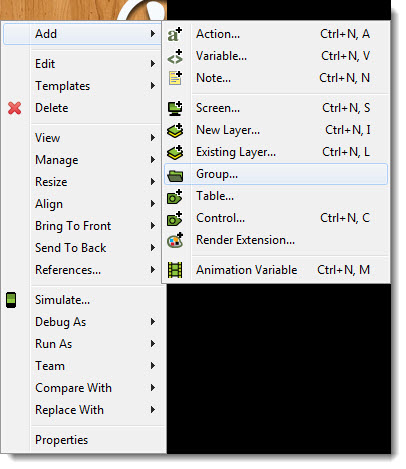
You can also add a group to your Storyboard application and then decide later on what controls you want in that group. Simply right-click in the Main Editor, and select Add -> Group. After the group has been created you can drag the needed controls into the group using the Application Model view.
Groups are highlighted upon selection in the Application Model or if they are ALT-selected in the editor. The selection displays the outline of the group contents and allows for resizing. Groups are also shown in the wireframe and outline mode.
Scrolling layers provide the ability to scroll multiple controls on a layer in an easy fashion similar to a scrolling table. Select the “Enable layer scrolling behaviour” check box in the Layer’s properties view to enable scrolling on a layer.
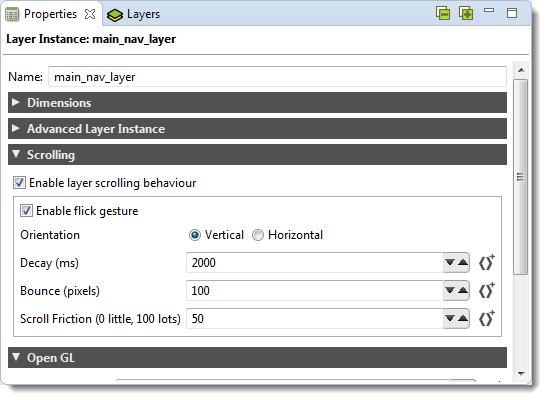
A scrolling layer behaves as a viewport to the controls on the layer. This means the size of the layer should be the size of the intended viewport. By scrolling the layer, Controls that are placed outside of the viewport will be brought into view.
When scrolling, the layer itself is not moving, the controls within the layer are. To measure this, the variables grd_xoffset and grd_yoffset may be used to determine how far the scrolling layer has scrolled away from its origin.
Orientation: Vertical or Horizontal scrolling
Decay: Maximum time in milliseconds the scrolling layer will scroll after a flick.
Bounce: Number of pixels for the scrolling layer to bounce when reaching the edge of the contents within the layer.
Scroll Friction: A number from 0 to 100 to determine the friction level of the scrolling layer. With higher friction it becomes more resistant to moving when swiped and more inclined to slowing down when released.
When exporting to an iOS Device all related files and available plugins are packaged into a single application for the device. Since this is the case there is no need to set up environment variables or specify runtime options on the target, since this will all be done in storyboard designer when you export the application.
To configure an iOS device to run your apps you need to set up a few things from Apple first:
Xcode
iOS developer account
A code signing certificate
The device ID of the apple products you will be running on
The identifiers of the applications you will be making
A provisioning profile
Xcode no longer includes the command line tools and need to be downloaded separately from the app store.
To obtain a developer account you will need to go to https://developer.apple.com, click on iOS Dev Center, then click register. After that follow their step by step instructions and you will be a registered iOS Developer.
Log into your iOS Development account and click on the iOS Provisioning Portal link at the right hand side of the page. In your Provisioning Portal, click "Certificates" in the left tab bar. If you do not have a certificate, there will be an option to submit one. To do this you will need to make a Signing request. You can do this by launching Keychain Access, located at /Applications/Utilities. Then go to Keychain Access > Certificate Assistant > Request a Certificate From a Certificate Authority. Enter your email address and your name, then check "save to disk". Once that has been generated, go back into the certificates page of your provisioning profile and submit it for approval. After the certificate gets approved, download the file and open it, and it will be added to you keychain access.
Log into your iOS Development account and click on the iOS Provisioning Portal link at the right hand side of the page. In your Provisioning Portal, click "Devices" in the left tab bar. Click the add devices button at the top right of the page. Here you will need the device's name and Device ID. To get these connect the device to your computer and find it in iTunes. With the device selected click on the device's serial number, and it will switch to the Device's Identifier. Then click Edit > Copy Identifier (UDID). Now return to your Provisioning Portal, paste the identifier and enter the name of the device.
Log into your iOS Development account and click on the iOS Provisioning Portal link at the right hand side of the page. In your Provisioning Portal, click "App IDs" in the left tab bar. For this section we recommend you set up a generic App ID and have it accept all of you applications. However if you wish to enable other iOS like Push Notifications or In-App Purchase, you will need to make an ID for that individual app. To create a generic App ID, click the Add New App ID Button. Now enter a description of the app this Id will match with, ex "Application Development ID". Now enter the Bundle identifier. If this is a generic App ID simply type "*". If this is for a specific app, enter the app's identifier. ex "com.cranksoftware.storyboardApp". Now click submit and you can go back to the previous page, find this App ID and configure all of the options this specific application needs.
Log into your iOS Development account and click on the iOS Provisioning Portal link at the right hand side of the page. In your Provisioning Portal, click "Provisioning" in the left tab bar. Click the New Profile button. Create a name for this profile. Select the certificates that will be used by this profile. Select the App ID that will be used by this profile. Select the Devices that will be used by this profile. Once this is completed, download the YourProvisionProfileName.mobileprovision file and save it to your computer. When you are exporting your Storyboard application, you will need to tell storyboard where this file is.
New actions can be added to the Storyboard Engine through standard programming extension points. In order to make those new actions available within the Storyboard Designer development environment it is necessary to describe the name and type of the action arguments in a template so that they can be properly presented within the Storyboard Designer user interface. This can be done on a project by project basis using an action template file.
An action template is an XML file with the following formatted content:
<actiontemplates>
<template name="NAME">
<arguments>
<element name="ARG_NAME" type="ARG_TYPE" />
... as many elements as there are arguments ...
</arguments>
</template>
... as many templates as there are actions ...
</actiontemplates>
The user defined fields are as follows:
- NAME
This is the name of the action as it appears in the Storyboard Engine runtime (gapp) file.
- ARG_NAME
This is the name of an argument option as it appears in the Storyboard Engine runtime (gapp) file.
- ARG_TYPE
This is the type of the argument and can be one of the following:
- string
A text string value
- integer
A numeric value with an optional range specified by 'min' and 'max' attributes
- float
A floating point numeric value with an options range specified by a 'min' and 'max' attributes
- boolean
A boolean true/false value
In order to be automatically included in a Storyboard
Designer project, the action template file should be placed in the
templates directory of the project where it is to be used.
The name of the template file can be anything valid for the file system, but
it should contain the file extension .sbat in order to identify
it as an action template file.
New render extensions can be added to the Storyboard Engine through standard programming extension points. In order to make those new render extensions available within the Storyboard Designer development environment it is necessary to describe the name and type of the render extension arguments in a template so that they can be properly presented within the Storyboard Designer user interface. This can be done on a project by project basis using an render extension template file.
A render extension template is an XML file with the following formatted content:
<rendertemplates>
<template name="NAME">
<arguments>
<element name="ARG_NAME" type="ARG_TYPE" />
... as many elements as there are arguments ...
</arguments>
</template>
... as many templates as there are actions ...
</rendertemplates>
The user defined fields are as follows:
- NAME
This is the name of the render extension as it appears in the Storyboard Engine runtime (gapp) file.
- ARG_NAME
This is the name of an argument option as it appears in the Storyboard Engine runtime (gapp) file.
- ARG_TYPE
This is the type of the argument and can be one of the following:
- string
A text string value
- integer
A numeric value with an optional range specified by 'min' and 'max' attributes
- float
A floating point numeric value with an options range specified by a 'min' and 'max' attributes
- boolean
A boolean true/false value
In order to be automatically included in a Storyboard
Designer project, the render extension template file should be placed in the
templates directory of the project where it is to be used.
The name of the template file can be anything valid for the file system, but
it should contain the file extension .sbrt in order to identify
it as an render template file.
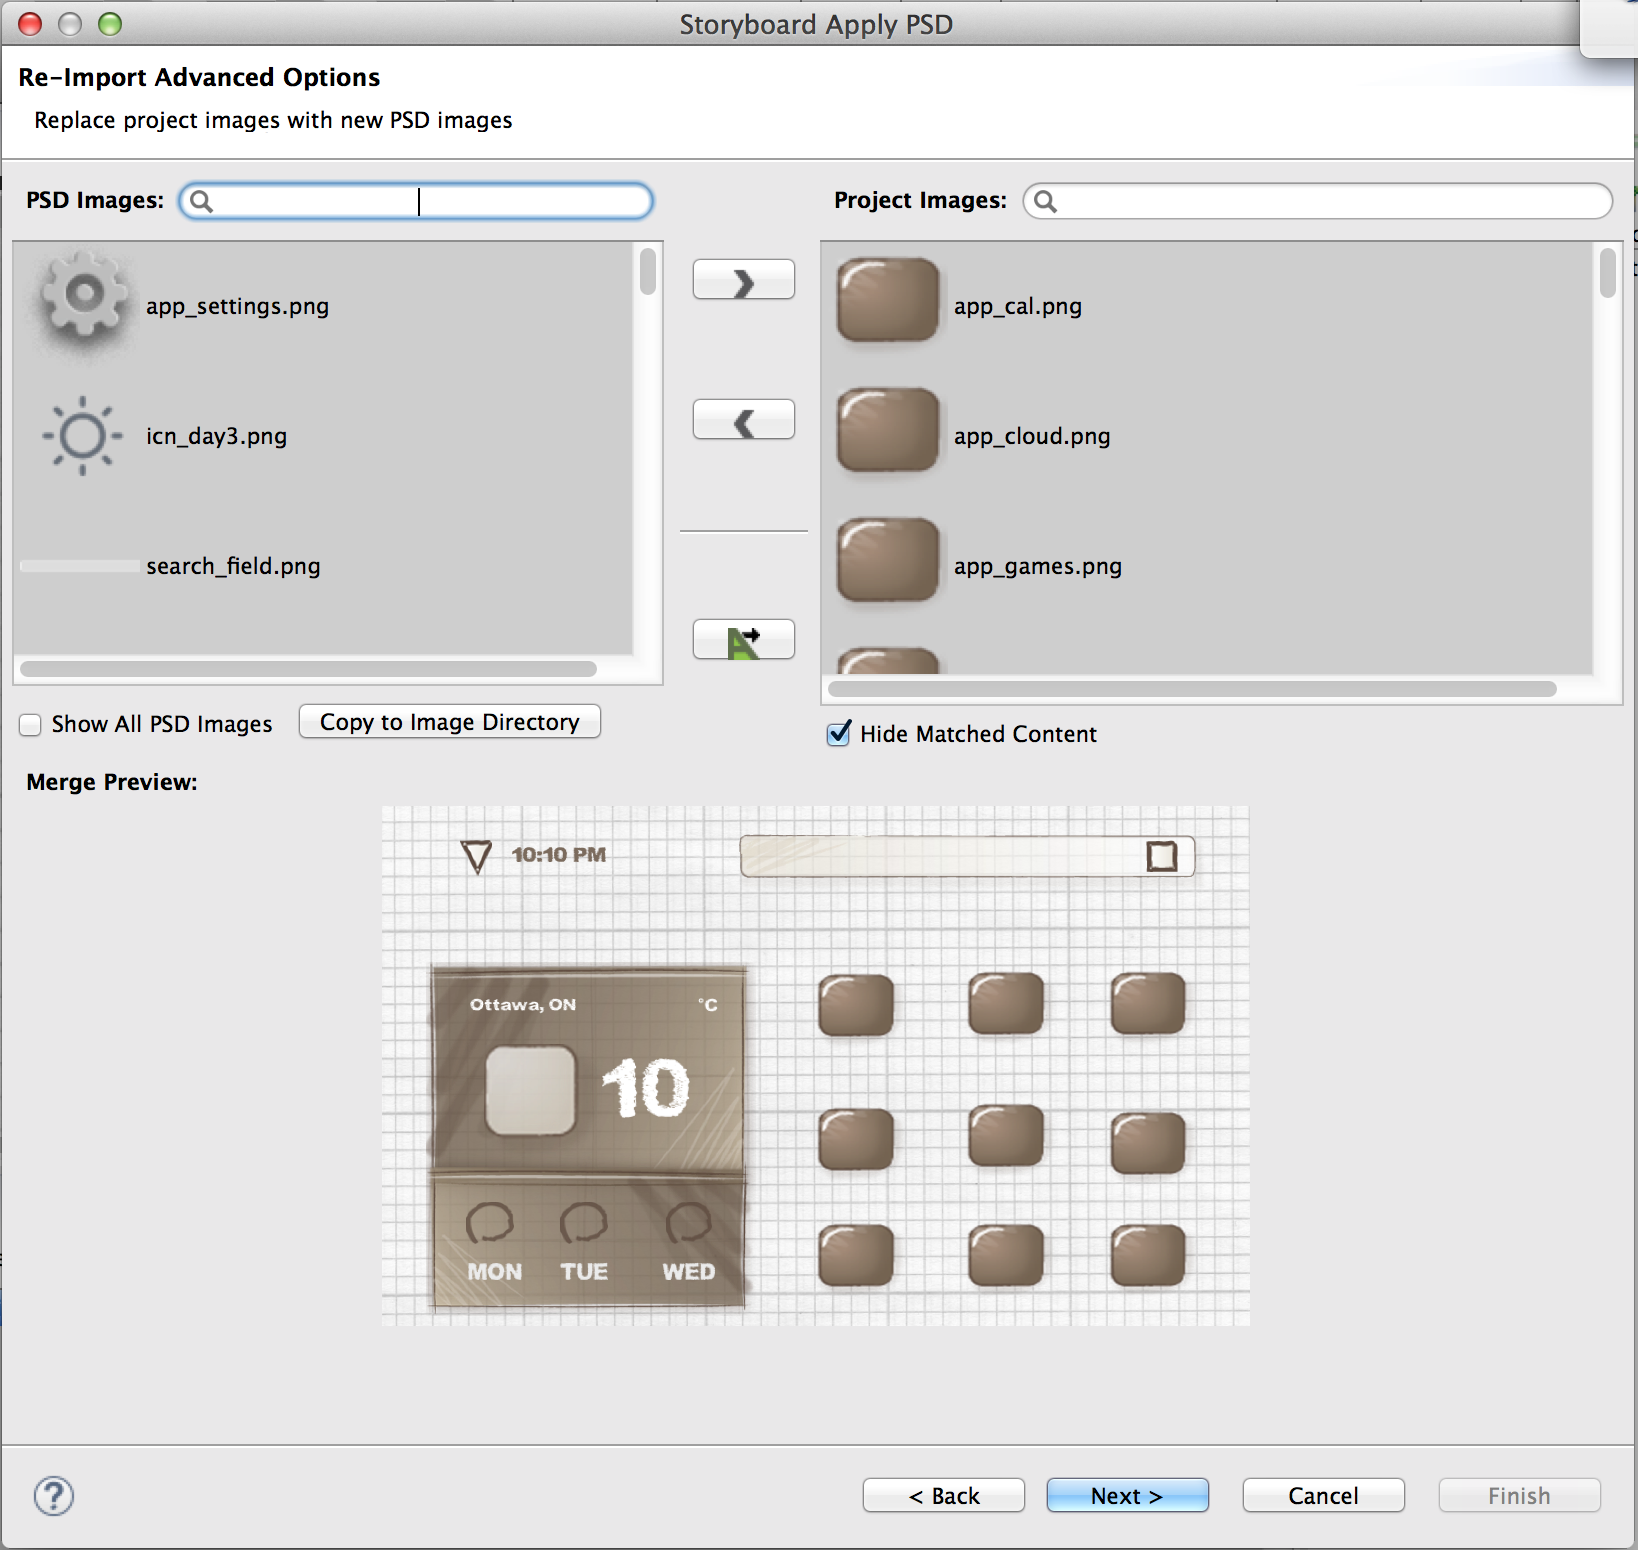
The Photoshop™ Re-Import feature enables the user to re-import a new or revised PSD file to replace existing images in a project's image directory. The re-import wizard is initiated from the main menu » File » Import
In the import dialog that appears, select the source PSD file to re-import and the destination Storyboard application where the new PSD image content will be placed. Then choose Next.
On the left of the dialog window is a list of image content from the PSD file. On the right is the content of the project’s image directory. Selecting any PSD image will show candidate image match content from the PSD file. By clicking the “move right” arrow the selected PSD image is adopted as the new project image and replaces the model selection.
Below the separator in between the two viewers is the 'Match All Images' button. This will go through and automatically map any unique images of the same name. The name and extension must be identical for images to be mapped. If there is more than one identical match, the image won't be mapped.
Matching and unmatching can be undone and redone by using the common keyboard shortcuts 'CTRL-Z' and 'CTRL-R'. If a PSD image does not have a project image with the same name it can still be added to the project image directory by clicking Copy to Image Directory button. Content that is being replaced will be shown in a preview below.
 |
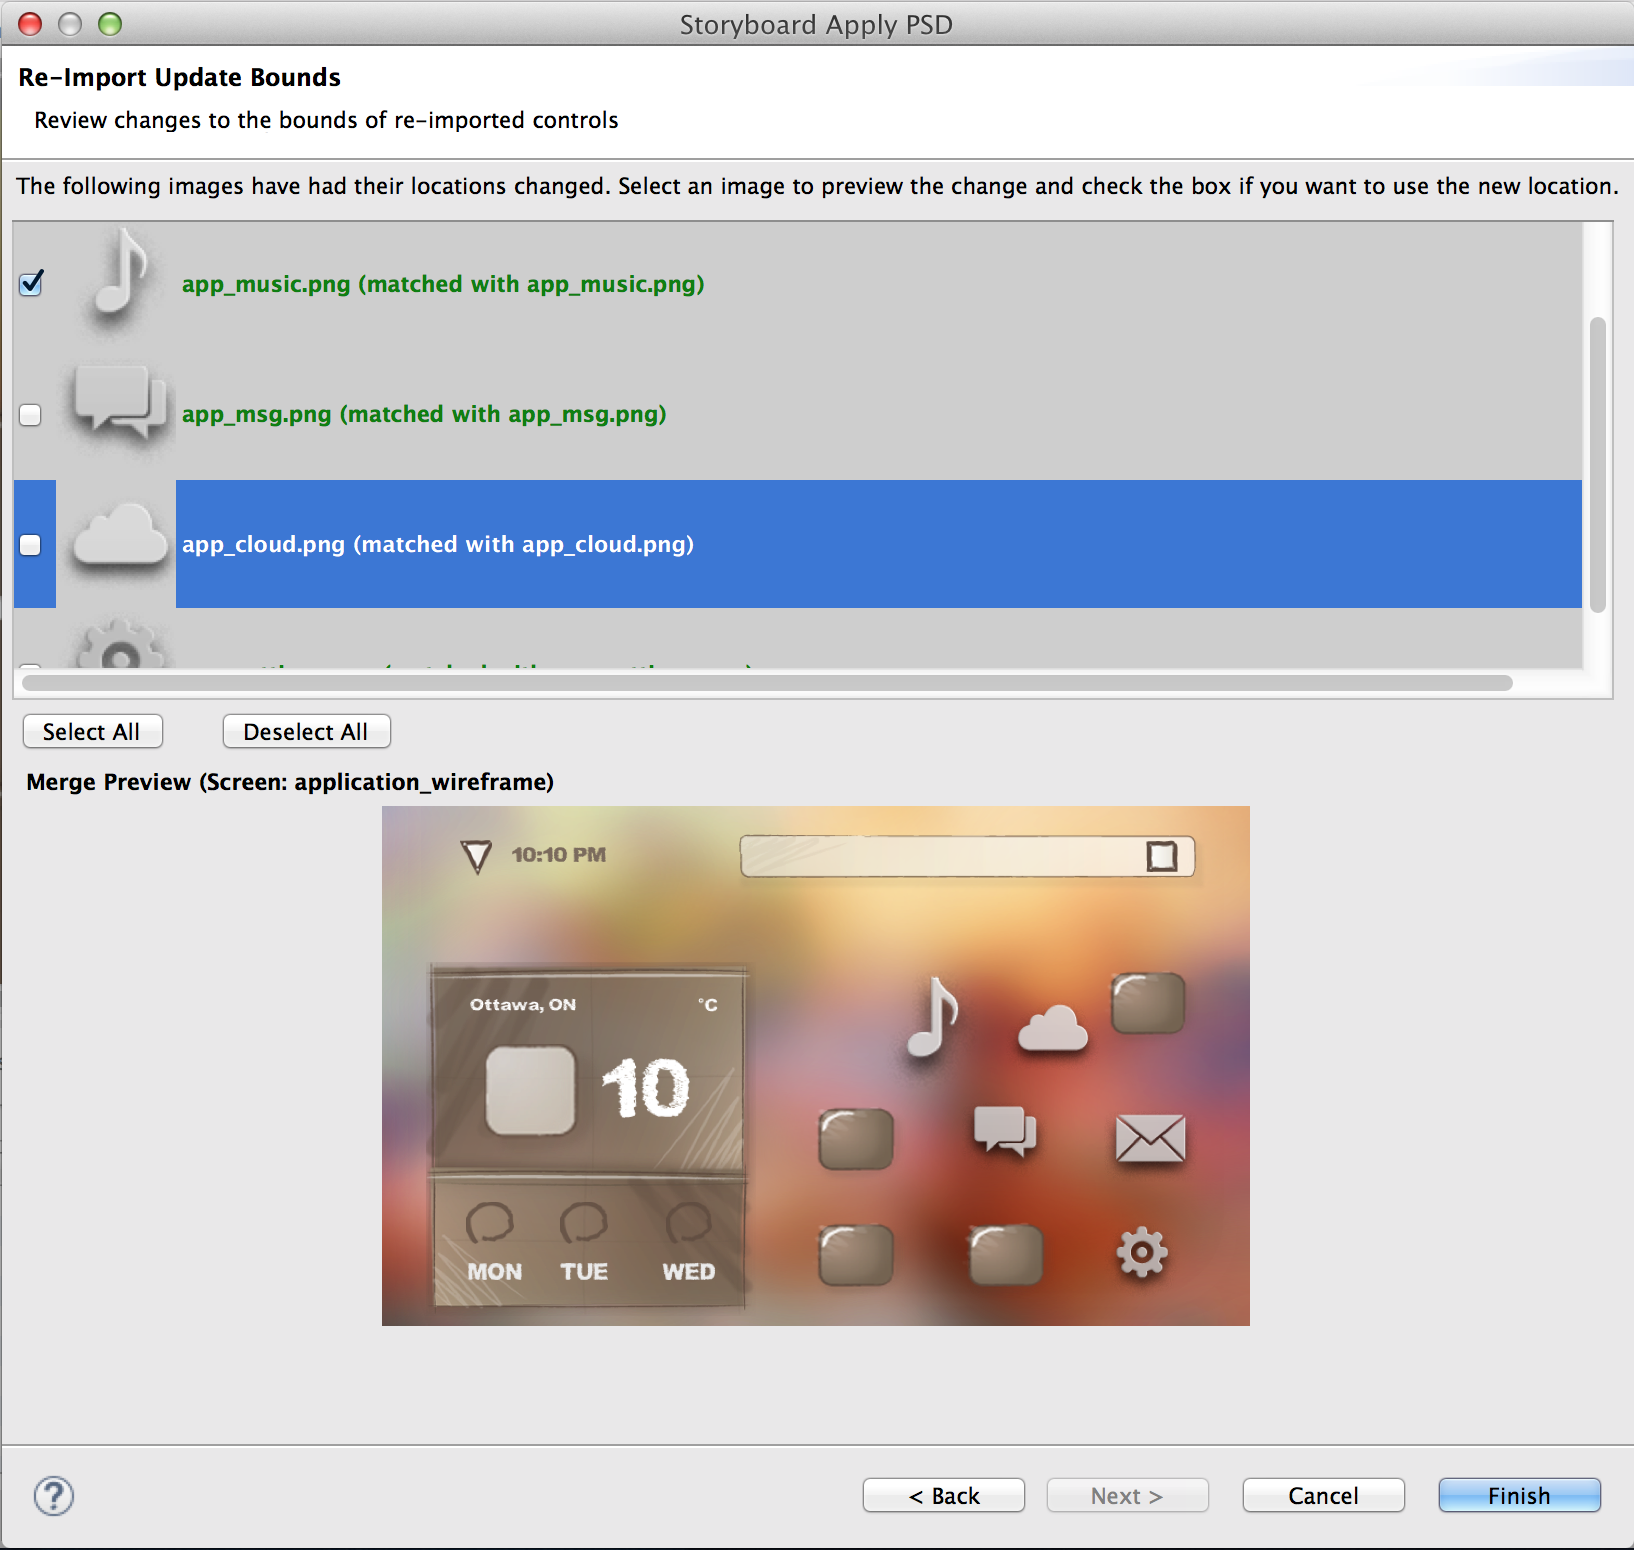
Choosing 'Next' brings you to a page that allows the user to update the bounds of any of the selected matches from the previous page. Any matches from the previous page that have changed location in the re-imported PSD file will appear in the list at the top. Selecting an item from this list shows the location change in the preview at the bottom, similar to the previous page. If you want to use the new location, check the box beside the match before hitting 'Finish'.
 |
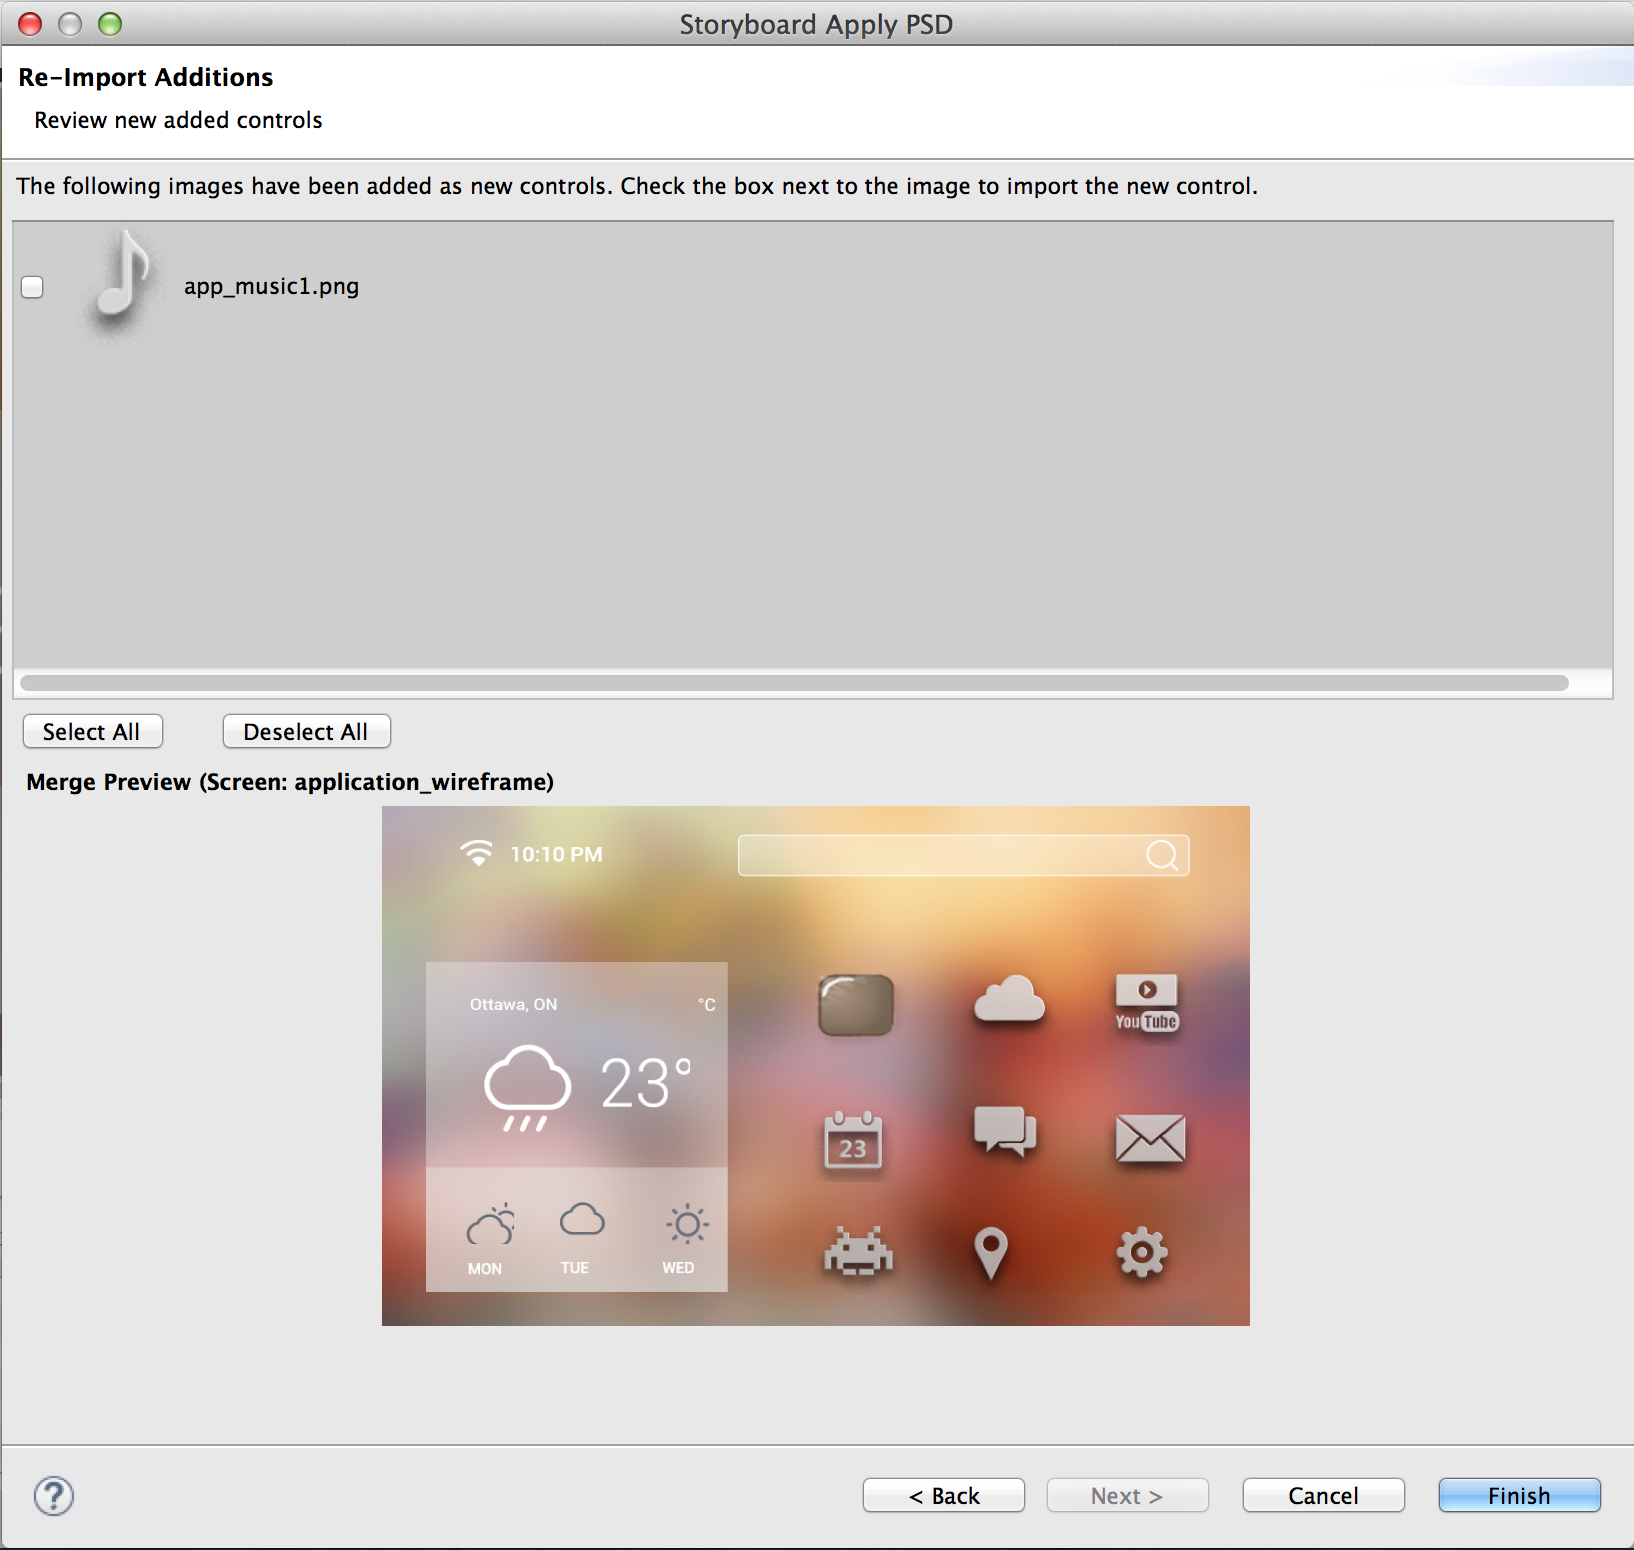
After updating the bounds, the next page allows the user to review any new images that have been added in the re-import. An image is considered new if it has no identical match in the current model, and it hasn't been mapped to anything in the first page. Selecting an item will preview it in the thumbnail below, similar to the previous page, and checking it will import the new control into the model.
 |
After choosing to replace, copy or add at least one image, clicking the Finish button will show a prompt that gives the option to overwrite image files that are being updated or keep a copy of the older images that are being replaced. The Photoshop PSD Re-Import feature is meant to update existing content using consistent naming. Using the Import Photoshop PSD File is better for adding new content to an existing project.