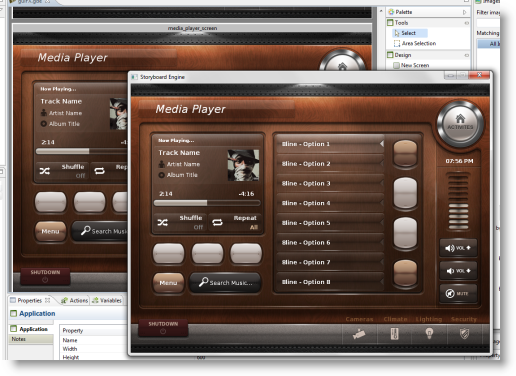
After an application has been created, it is a good idea to run it through the simulator to validate the runtime behaviour before exporting the application to a Storyboard Embedded Engine deployment file. The simulator is a host based instance of the Storyboard Embedded Engine and should exhibit the same operational behaviour as the target, though there may be differences in the level of performance obtained because of the different CPU and graphics characteristics.
Simulating a Storyboard application is a straightforward process. From the Navigator view you can right click on the Storyboard designer file (*.gde) and select the Storyboard Simulator option.
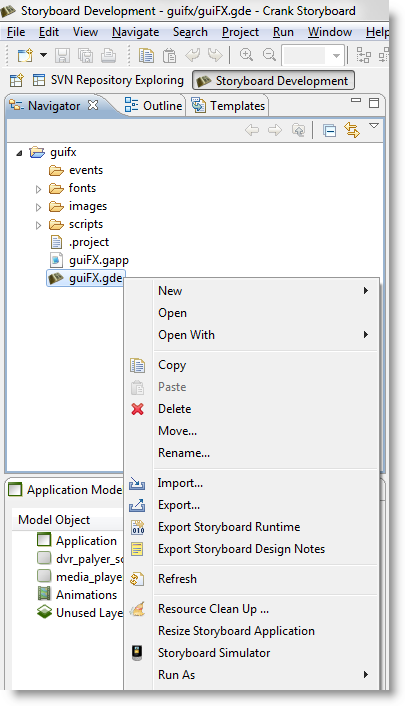
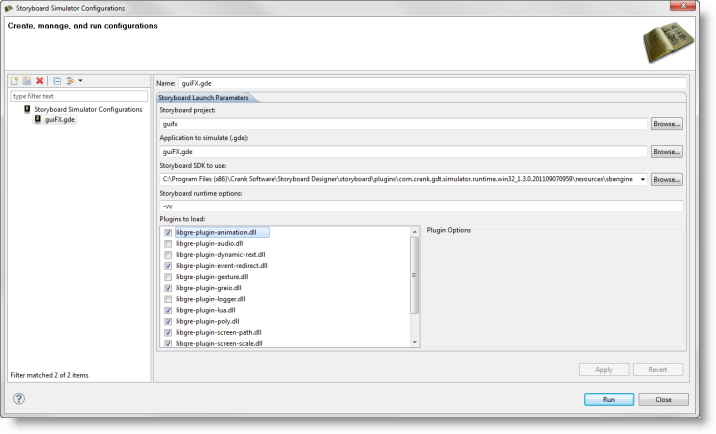
Alternatively you can select the Storyboard Simulator option from the toolbar or main menu and select Storyboard Simulator Configurations… which will allow you to customize how the simulator is launched.
The options include configuring which plug-in are to be loaded by the simulator and what level of verbosity should be used to run the simulator.
 |
When the simulator is launched, then it will perform an automatic export to a Storyboard Embedded Engine to a temporary directory and run the application in its own window on the host system.
Exporting a Storyboard Embedded Engine configuration is initiated from the main menu as File > Export. This will bring up the export wizard.
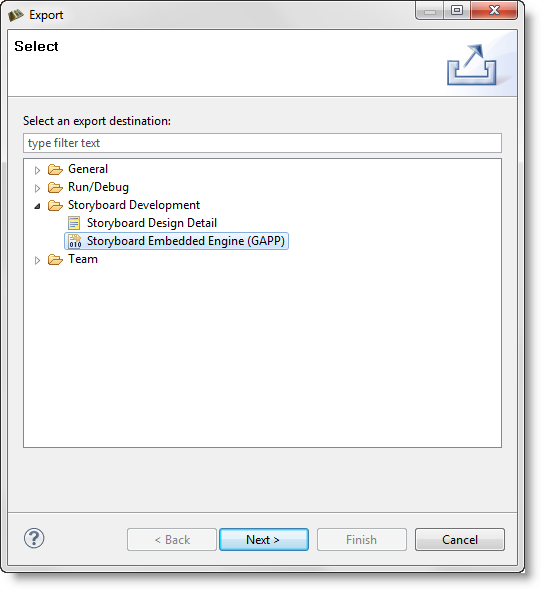
Selecting the Storyboard Embeded Engine (GAPP) option and clicking Next will bring up an export file selection dialog. Select the Storyboard application file (*.gde) that you want to export and the output location that you want to export to.
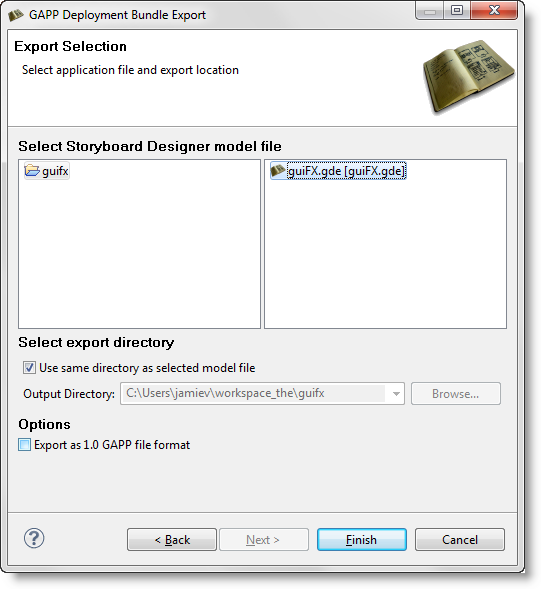
Selecting Finish at this point will create the specified directory and create a Storyboard Embedded Engine (*.gapp) runtime file and also export the resources from the images, fonts and scripts directories.
It also possible to perform headless exports of the Storyboard Design files to the Storyboard Embedded Engine files from a command line or scripting environment.
					PATH_TO_INSTALL/Storyboard_Designer/storyboard/Storyboard -application
					com.crank.gdt.ui.gappexport model=<PathToGDEFile>
					output=<PathToGAPPFile>
Where the model is the full path to the Storyboard Designer
model file and the output parameter specifies where the
filesystem path where the Storyboard Engine file will be created and the
associated resources created.
Exporting as an Android application will create an Android package that is suitable for use on Android devices. The packages generated will only work on devices running Android version 2.3.3 and above.
The creation of an Android package is initiated from the main menu as File > Export. This will bring up the export wizard:
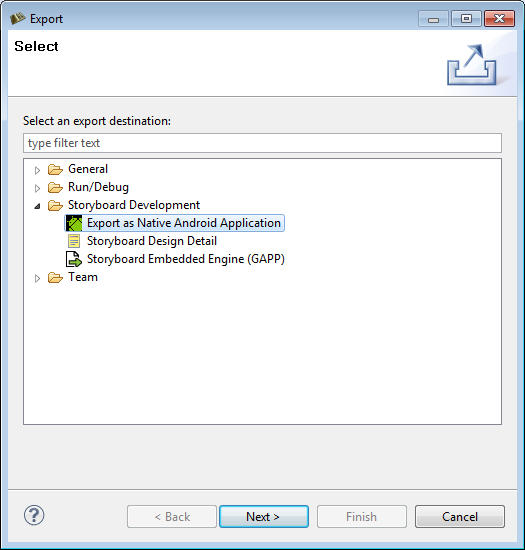 |
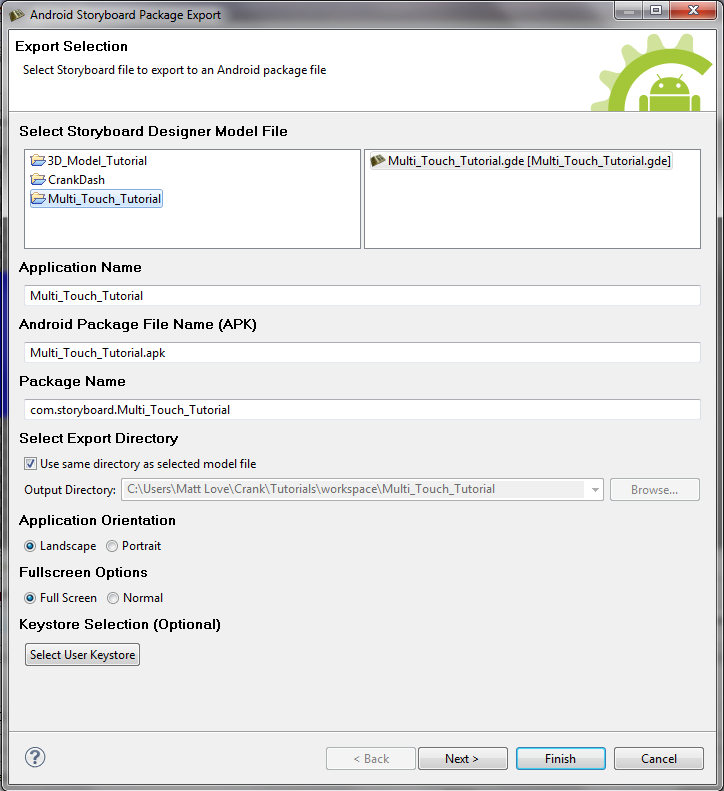
Selecting the Export as Native Android Application option and clicking Next will bring up an export file selection dialog. Select the Storyboard application file (*.gde) that you want to export. Choose appropriate names for the application name, android package file name, and the package name. Select the directory to export to and options for application orientation and fullscreen. Clicking Select User Keystore allows the use of a user-defined key to sign the application (optional).
![[Note]](file:/C:/eclipse_docbook_3.5/plugins/com.oxygenxml.editor_11.2.0.v2010090711/frameworks/docbook/xsl/images/note.png) | Note |
|---|---|
Currently, without rooting an Android device, there is no way of disabling the bottom bar for some Android 3.0+ devices. This is a Google design decision. |
 |
Clicking Next at this point will bring up the a page with options for choosing a specific Storyboard Engine to use, setting Storyboard runtime options (see Storyboard Engine Options for list of available runtime options), and for selecting the icons for the application. Optionally Finish could be selected to use the defaults.
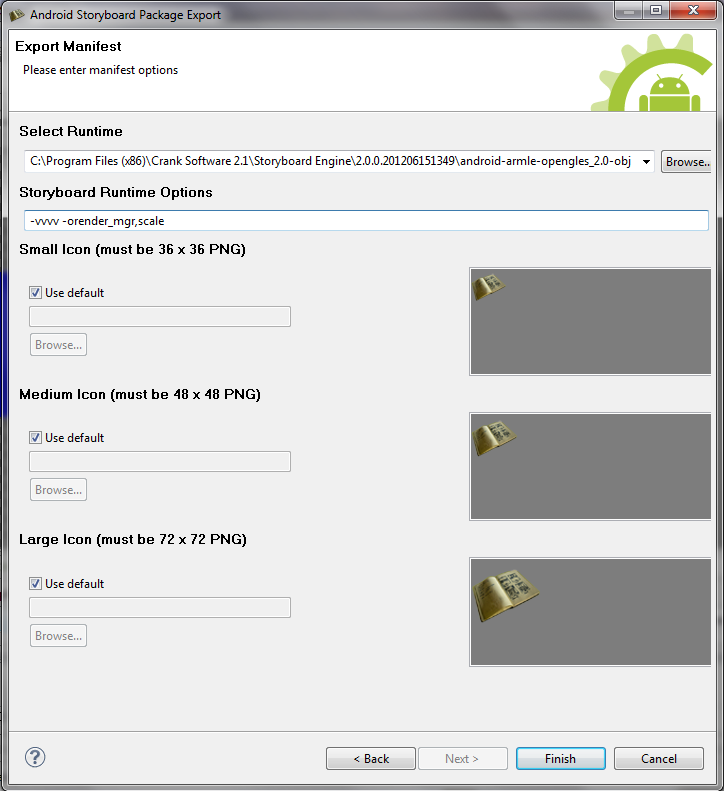 |
Selecting Finish at this point will create the Android application package file (APK) in the directory specified. This application package can then be transferred to an Android device by simply copying the package onto a USB or SD card.
Storyboard makes translating and internationalizing the text content of your application a straightforward activity. Dynamic text content is treated the same as any other dynamic content that is rendered to the display. Within the text render extension, the translatable content should be associated with a variable. Any changes that occur to that variable, will trigger a screen re-draw to occur if that variable is being used in the current display.
This automatic reflection of changes in string content makes the translation activity significantly less labour intensive as all that is required to apply the translated content to the application, is to update a number of data variables with the appropriate UTF-8 encoded text string. An complete translation example is provided in the translation Storyboard sample available via File > Import > Storyboard Sample.
In some circumstances, most notably with non-latin character sets, it may also be a requirement to dynamically change the fonts being used to map to an alternative font that provides the appropriate glyph support for the characters being rendered. Additionally it may be that a change in translated text requires additional attributes to be adjusted, such as font point size or control dimensions, to accommodate the new translation. These can be adjusted as a straightforward data change to a dynamic variable. In all situations the UI will automatically refresh to show the new content.
Storyboard provides two editor functions that allow translations to be quickly prototyped in the context of the design environment.
The Create Translation toolbar item will scan through the
application and identify all of the bound text variables that are used and extract
them to a comma separated (csv) file that contains the Storyboard variable key and
the translated text string. By default this file is saved in the translations
directory of the project. This file can serve as the basis for performing a dynamic
load of translated content or could simply be used by designers to ensure that the UI
is appropriate for different language configurations.
The Apply Translation toolbar item scans the
translations directory of a project for suitable translation files and
presents a dialog that allows the user to immediately change all of the variable definitions
in a project to the values declared in the translation file. This feature allows developers
a quick way to preview their content in different language configurations.
Storyboard Designer allows developers to create re-usable design components, templates, that can be shared among multiple projects.
A template is created by selecting a Storyboard Designer model element in either the Storyboard editor or the Application view and right clicking and selecting Create New Template. A dialog will prompt for a template name, description and the name of the file to save the template as.
Any number of controls may be templated together, regardless of their parent layers. The control template generator will transfer over all variables, actions and render extensions that are associated with the template source controls. The template will also contain a copy of all images, fonts and script file resources and transfer any animations that are referenced by the control.
When the template is applied if these resources don't exist in the existing project then they will be transfered from the template to the containing project. If the resources already exist, then it is assumed that these resources should be used in place and the existing resources are not modifed.
Templates are stored in an external file format so that they can be shared and incorporated into other projects by adding them into the target project's templates directory. Once they have been added to that directory they will be parsed by the project and will be displayed in the Templates view and be made available for use. By default new templates are saved in that project's templates directory.
When exporting to an iOS Device all related files and available plugins are packaged into a single application for the device. Since this is the case there is no need to set up environment variables or specify runtime options on the target, since this will all be done in storyboard designer when you export the application.
To configure an iOS device to run your apps you need to set up a few things from apple these include:
iOS developer account
A code signing certificate
The device ID of the apple products you will be running on
The identifiers of the applications you will be making
A provisioning profile
To obtain a developer account you will need to go to https://developer.apple.com, click on iOS Dev Center, then click register. After that follow their step by step instructions and you will be a registered iOS Developer
Log into your iOS Development account and click on the iOS Provisioning Portal link at the right hand side of the page. In your Provisioning Portal, click "Certificates" in the left tab bar. If you do not have a certificate, there will be an option to submit one, To do this you will need to make a Signing request. You can do this by launching Keychain Access, located at /Applications/Utilities Then go to Keychain Access > Certificate Assistant > Request a Certificate From a Certificate Authority Enter your email address and your name, then check "save to disk" Once that has been generated, go back into the certificates page of your provisioning profile and submit it for approval After the certificate gets approved, download the file and open it, and it will be added to you keychain access
Log into your iOS Development account and click on the iOS Provisioning Portal link at the right hand side of the page. In your Provisioning Portal, click "Devices" in the left tab bar Click the add devices button at the top right of the page Here you will need the device's name and Device ID To get these connect the device to your computer and find it in iTunes With the device selected click on the device's serial number, and it will switch to the Device's Identifier Then click Edit > Copy Identifier (UDID) Now return to your Provisioning Portal, paste the identifier and enter the name of the device
Log into your iOS Development account and click on the iOS Provisioning Portal link at the right hand side of the page. In your Provisioning Portal, click "App IDs" in the left tab bar For this section we recommend you set up a generic App ID and have it accept all of you applications. However if you wish to enable other iOS like Push Notifications or In-App Purchase, you will need to make an ID for that individual app. To create a generic App ID, click the Add New App ID Button. Now enter a description of the apps this Id will match with, ex "Application Development ID" Now enter the Bundle identifier If this is a generic App ID simply type "*" If this is for a specific app, enter the app's identifier. ex "com.cranksoftware.storyboardApp" Now click submit and you can go back to the previous page, find this App ID and configure all of the options, this specific application needs
Log into your iOS Development account and click on the iOS Provisioning Portal link at the right hand side of the page. In your Provisioning Portal, click "Provisioning" in the left tab bar Click the New Profile button Create a name for this profile Select the certificates that will be used by this profile Select the App ID that will be used by this profile Select the Devices that will be used by this profile Once this is completed download the file, YourProvisionProfileName.mobileprovision, and save it to you computer, somewhere you will remember it. When you are exporting, you will need to tell storyboard where this file is.
New actions can be added to the Storyboard Engine through standard programming extension points. In order to make those new actions available within the Storyboard Designer development environment it is necessary to describe the name and type of the action arguments in a template so that they can be properly presented within the Storyboard Desginer user interface. This can be done on a project by project basis using an action template file.
An action template is an XML file with the following formatted content:
<actiontemplates>
<template name="NAME">
<arguments>
<element name="ARG_NAME" type="ARG_TYPE" />
... as many elements as there are arguments ...
</arguments>
</template>
... as many templates as there are actions ...
</actiontemplates>
The user defined fields are as follows:
- NAME
This is the name of the action as it appears in the Storyboard Engine runtime (gapp) file.
- ARG_NAME
This is the name of an argument option as it appears in the Storyboard Engine runtime (gapp) file.
- ARG_TYPE
This is the type of the argument and can be one of the following:
- string
A text string value
- integer
A numeric value with an optional range specified by 'min' and 'max' attributes
- boolean
A boolean true/false value
In order to be automatically included in a Storyboard
Designer project, the action template file should be placed in the
templates directory of the project where it is to be used.
The name of the template file can be anything valid for the filesystem, but
it should contain the file extension .sbat in order to identify
it as an action template file.
New render extensions can be added to the Storyboard Engine through standard programming extension points. In order to make those new render extensions available within the Storyboard Designer development environment it is necessary to describe the name and type of the render extension arguments in a template so that they can be properly presented within the Storyboard Desginer user interface. This can be done on a project by project basis using an render extension template file.
A render extension template is an XML file with the following formatted content:
<rendertemplates>
<template name="NAME">
<arguments>
<element name="ARG_NAME" type="ARG_TYPE" />
... as many elements as there are arguments ...
</arguments>
</template>
... as many templates as there are actions ...
</rendertemplates>
The user defined fields are as follows:
- NAME
This is the name of the render extension as it appears in the Storyboard Engine runtime (gapp) file.
- ARG_NAME
This is the name of an argument option as it appears in the Storyboard Engine runtime (gapp) file.
- ARG_TYPE
This is the type of the argument and can be one of the following:
- string
A text string value
- integer
A numeric value with an optional range specified by 'min' and 'max' attributes
- boolean
A boolean true/false value
In order to be automatically included in a Storyboard
Designer project, the render extension template file should be placed in the
templates directory of the project where it is to be used.
The name of the template file can be anything valid for the filesystem, but
it should contain the file extension .sbrt in order to identify
it as an render template file.