3D Transforms and Custom Shaders
In the for control and layer model elements there is an Advanced and OpenGL section that exposes transform options for the selected model object.
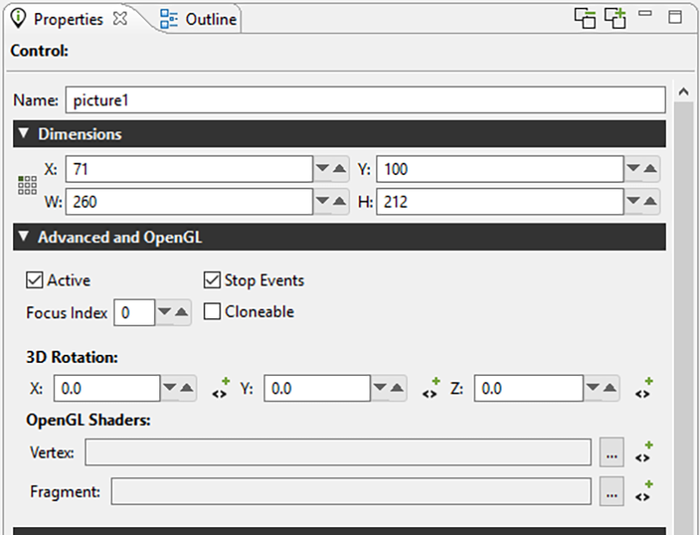
The X/Y/Z 3D Rotation transform properties allow the layer or control to be rotated around an imaginary axis that runs through the center of the object. This can be used to achieve simple perspective changes on an object, for example a cover flow style roll-over effect. These 3D rotation properties can be bound to variables and used any place a normal variable would be including animations and scripted data changes. The OpenGL3DModel rotates it's text field layer using a 3D rotation.
Also located within this Advanced and OpenGL property panel are properties for OpenGL Vertex and Fragment Shaders. These GLSL shaders can be provided as files and when provided will be used to process the control or layer after its base content has been rendered. Similar to the 3D Rotation properties, these files can be associated with variables and changed dynamically at runtime.
A complete description of OpenGL ES 2.0 shaders is beyond the scope of this document and the GLSL shader language itself is better treated in detail in the OpenGL ES Shader Language specification. This chapter will focus on the shader programming aspects that are relevant to Storyboard developers.
![[Note]](images/note_635484789.png) | Note |
|---|---|
At this time, shader effects are not visible within the tool and are only visible when using an OpenGL based Storyboard Engine. |
The shaders that are specified in the properties will be applied to the resulting texture that is the outcome of having all of the current render extensions applied to it. That is to say that the control is effectively rendered as it would be in the normal sense, but the final result is provided as a texture to the shaders to manipulate before it is finally rendered to the display.
Shader programs have three types of variables: attributes, varying, and uniforms. Attributes are passed into the shader from the render manager and contain data such as vertex locations, and texture coordinates. Varying variables are calculated in the vertex shader and passed into the fragment shader after being interpolated based upon the location of the fragment. Uniforms are also passed in from the render manager, but are typically used for purposes other than storing the geometry being rendered, for instance, containing a global alpha value which can be used to blend an entire model.
When writing a shader program, it is important to follow the conventions for attributes and uniforms established by the render manager. Otherwise, it will not be able to pass in geometric data and nothing will be rendered. Below is a minimal vertex shader which matches the functionality of the built in vertex shader for images.
attribute vec4 myVertex;
attribute vec4 myUV;

varying vec2 vtex;

uniform mat4 projMatrix;
uniform mat4 mvMatrix;

void main(void)
{
    gl_Position = projMatrix * mvMatrix * myVertex;
    vtex = myUV.st;
}
The myVertex and myUV attributes contain vertex and texture coordinates respectively. The projMatrix and mvMatrix contain the projection and modelview matrices, which are used to transform the input vertex position, which is then assigned to the gl_Position for the vertex. The varying vtex is used to hold the interpolated texture coordinate which is then passed to the fragment shader. The render manager looks up myVertex, myUV, projMatrix and mvMatrix by name when it loads the shader, so these names must be used in any custom vertex shader. The varying name must match between the vertex shader and the fragment shader.
Below is a fragment shader which matches the functionality of the built in fragment shader for images, and shows the minimal code required to work with the Storyboard render manager.
#ifdef GL_ES
precision mediump float;
#endif
uniform sampler2D sampler2d;
varying vec2 vtex;

void main (void)
{
    gl_FragColor = texture2D(sampler2d, vtex);
}
The initial precision declaration is required by OpenGL ES, but not supported by OpenGL, and is set with a preprocessor conditional. The sampler2D uniform controls which texture unit is used when sampling a texture. The render manager only supports a single texture. The varying variable is interpolated based upon the vertex values in the vertex shader, and is passed into the sampler to look up the color at the fragment location. This is assigned to gl_FragColor and becomes the fragment color.
It is also possible to pass data from Storyboard variables to shader uniform variables, subject to two constraints: the model element for the variable must be the control for which the custom shaders are being used and the variable type must be float. When the custom shader is loaded, a list of all of the uniforms present is created. The name of each uniform is then compared to the list of variables attached to the control, and if a matching name of the appropriate type is found, it is used to the set the value of the uniform when the control is rendered.
As an example, consider animating a custom shader to do a simple fade-in based upon the value of a timer. First, create a variable of type float called "current_time" for the control with the custom shader. Then create an animation using the animation timeline which changes the value of the variable from 0.0 to 1.0 over a few seconds, and create an appropriate trigger for the animation, for instance a mouse press event. Then, edit your fragment shader as follows:
#ifdef GL_ES
precision mediump float;
#endif

uniform float current_time;
uniform sampler2D sampler2d;
varying vec2 vtex;

void main (void)
{
    gl_FragColor = texture2D(sampler, vtex) * current_time;
}
When the control is rendered, the value of the uniform current_time will be set from the value of the control variable current_time, which will cause the color read from the texture to be scaled from 0.0 to 1.0 over the duration of the animation, causing a fade in effect.