Storyboard is designed to be used to develop and run fullscreen application user interfaces. Developing a Storyboard application is straightforward and simple, but relies on understanding a few concepts and terms and how they relate to one another within the Storyboard framework.
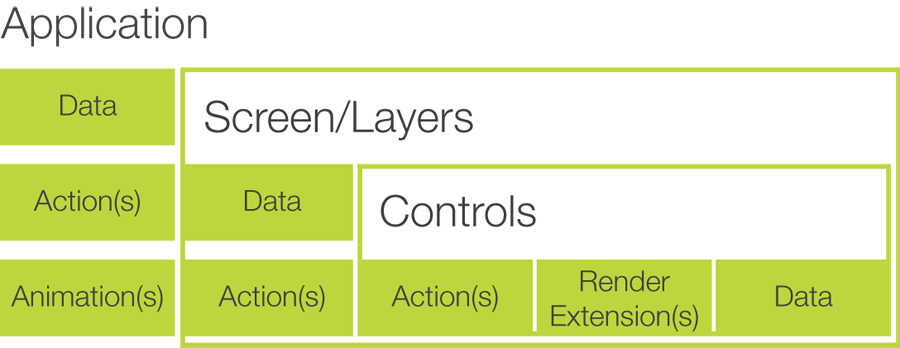
A Storyboard application is composed of a hierarchy of model elements: Screens, layers, groups and controls.
An application can be composed of multiple screens, however only a single screen is ever visible at one time.
Each screen is composed of one or more layers. The screen controls how multiple layers have their content composited together to form final display output. Where possible, layers may be mapped directly to layers in the graphic hardware. Multiple screens can reference the same layer, effectively sharing the visual content of the layer and creating multiple layer instances. All layer instances share the same visual content, but the position and visibility of the layer is specific to the screen context where it is being used. When a screen is painted, the z-order of the layer instances is used to determine which areas of a layer are visible to the user.
Layers contain controls and groups. Controls are the containers for renderable content such as images and text. Groups provide organizational structure that allow controls to be associated together in a common named container. A control is sized and positioned relative to its parent, layer or group, and contains zero or more render extensions that describe the type of rendering to occur when the control is damaged and redrawn. Controls are the only model elements in a Storyboard application that track input focus.
Each of the screen, layer, groups and control model elements are named items. Screen and layer names must not collide with one another and must be uniquely named. Control and group names must be unique within the scope of their parent container.
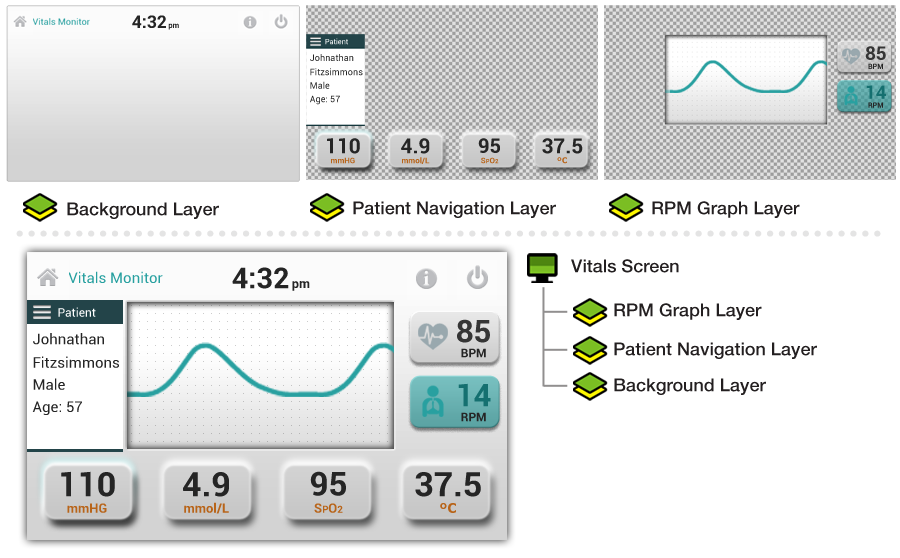
A screen represents the user's view at any given moment. A screen is composed of one or more layers. These layers are composited to the screen in a z-order (back to front) in order to combine them to form the desired output. Each screen has a name and by using screen transition actions a user can traverse the user interface's many screens.
Here is an example of a screen containing three layers containing controls with images and text that combine to form the final screen:
Layers are the containers for controls and groups. A screen in the user interface is generally composed of multiple layers. A single layer can be reused and shared across multiple screens to allow common content to be displayed and manipulated. If the control or group content of a layer is changed, that change will propagate to all screens where that layer is being displayed. Certain layer attributes, such as a layer's position or its visibility are maintained on a per-screen instance basis. This allows designers to hide, show and move content on a screen by screen basis without affecting other screens where the layer may be used.
Layers can receive events and respond with actions as well as contain variables that can be referenced by other model elements. These events and variables are common to all places the layer is used.
Groups are containers for controls. Groups provide a mechanism to organize content and to place common UI elements together along with variables that may be shared among the controls. Groups have a position within a layer and a size that is dictated by the groups children. All controls within the group are laid out relative to the group's origin.
Groups can receive events and respond with actions as well as contain variables that can be referenced by other model elements, in particular the child controls of the group.
A user interface is made up of many controls. A control is a rectangular area of the screen that can render content and react to events. Each control can be made up of many render extensions and react to any number of events. Controls can be shown or hidden and active/inactive as the system requires. A special type of control, called a table, is available to create row/column-based layout of information. Each column in a table can have a distinct template for rendering. This allows for efficient and easy creation of list-style information.
A render extension is the most basic piece of the user interface. It is responsible for rendering a specific type of content. Render extensions must be bound to a specific control and are not permitted to draw beyond the boundaries of the control to which they are bound. It is possible to include multiple render extensions on a control, and the order in which they are declared in the deployment bundle will define the order in which they perform their rendering.
Some render extensions included with the standard Storyboard release include:
Render an image (PNG, GIF, JPEG)
Render a text string
Render a filled polygon, arc, circl or rectangle
Render a 3D model (OBJ, GLES)
When designing a user interface, it is often possible to achieve the same look and feel by using multiple render extensions on a control or by using multiple controls with overlapping behaviour. The general rule of thumb is that multiple render extensions on a single control should be used when there is a common event for action binding that would occur for all of the visual components being displayed.
Events are the basic communication mechanism for triggering activity and passing data in a Storyboard application.
Events contain a name and a binary data payload. The content of the data payload is described using a format string that allows clients to generically decode the data payload. For example, the Lua action performs this decoding to allow access to the event data using string keys.
Events may be received from multiple input sources, but are processed serially by the Storyboard Engine. Clients can quickly and easily define their own custom events to enhance and drive their application, and to use these in conjunction with the standard event definitions provided by Storyboard.
A complete list of standard events can be found in the events definition section of this document.
New events can be readily defined and are not required to contain
a data payload. In this case their format string and data payload
will be empty values. When creating new events, it is appropriate
to namespace the event definitions so that the names of events do
not collide. For example, the Storyboard framework reserves the
name prefix of gre. for user interface events, and the
timer functions all generate events that are prefixed with
timer.
The use of events is closely coupled with the declaration and operation of actions. An action can only be invoked when an event matching the action definition is received. This results in a common design pattern where an action will perform sophisticated logic in an external script or program and then signal a completion action to run once the script work is complete.
Event >Action (script) >Work >Trigger Event >Action (completion)
The format string on the event is used to assist with decoding event data. This decoding is used in the action bindings, to allow a minimal amount of additional logic to be placed into the event matching code, and also by certain advanced actions, such as Lua scripts, that can symbolically access the event data in the context of the script.
The format string provides a description of how to interpret the
memory block (typically a data structure) that is associated with
the event as its data payload. The format string is relatively
straightforward to create and uses blocks that are formatted as
[numbytes][signed/unsigned][numelements][ ][name].
For the standard C data types the number formatting would look
like:
1s0     --> Special null terminated string
1s1|1u1 --> 1 byte integer (int8_t uint8_t)
2s1|2u1 --> 2 byte integer (int16_t uint16_t)
4s1|4u1 --> 4 byte integer (int32_t uint32_t)
4f1     --> 4 byte floating point (IEEE754 float)
8s1|8u1 --> 8 byte integer (int64_t uint64_t)
So, if you were transmitting a structure such as:
struct {
 int32_t    a;
 uint16_t   b;
};
You could use a format string containing 4s1 a 2u1 b
to describe the event.
The event data field descriptions a and
b are optional. They are used to give the data
symbolic representation for clients and do not have to be named to match
the C structure field values. The descriptions are used by clients
of the event data to symbolically access the event data. The Lua
script plugin, for example, will use the symbolic name information
as keys to a table that stores the event data content, appropriately
decoded based on the format string definition.
The format string provided describes the memory layout of the data associated with the event. Consequently it is important that the format string compensate for any alignment or compiler padding provided by inserting appropriate additional format entries to skip over unused bytes. This may require slight adjustments to the format string based on the CPU architecture or compiler settings regarding C structure alignment.
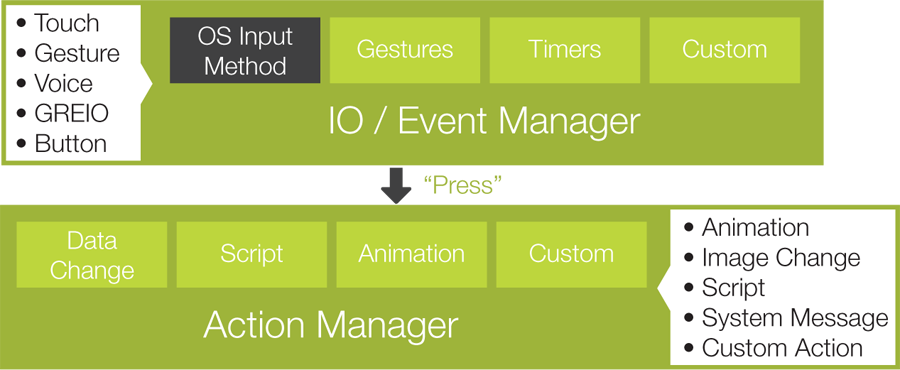
Events trigger actions. Actions perform tasks; manipulate data, interact with the system, log messages, generate more events, etc.
Actions can be associated with any model object, but they are frequently associated with controls. When an event is received it is matched first against the actions associated with the currently focused control. After the control's actions, the processing passes to the actions associated with the visible layers on the screen, followed by the screen and application actions. This cascade of action handling provides an opportunity for the action execution to take place in the model context (application, screen, layer, control) that is most appropriate.
Actions are always invoked in response to an event to perform some sort of activity, and they are always executed in the context of the main execution thread. The trigger event might be a Storyboard standard event or a user event, and it might come from within the application, from a Lua script action, or be generated from an external program and injected using the Storyboard IO library.
More than one action might be invoked when an event is received. In this case the order in which the actions are declared within the design is the sequence that they will be invoked when an input event is matched. This action ordering can be used to ensure an order of operations execution. For example, changing the value of a data variable has to happen before executing a script that references that data variable.
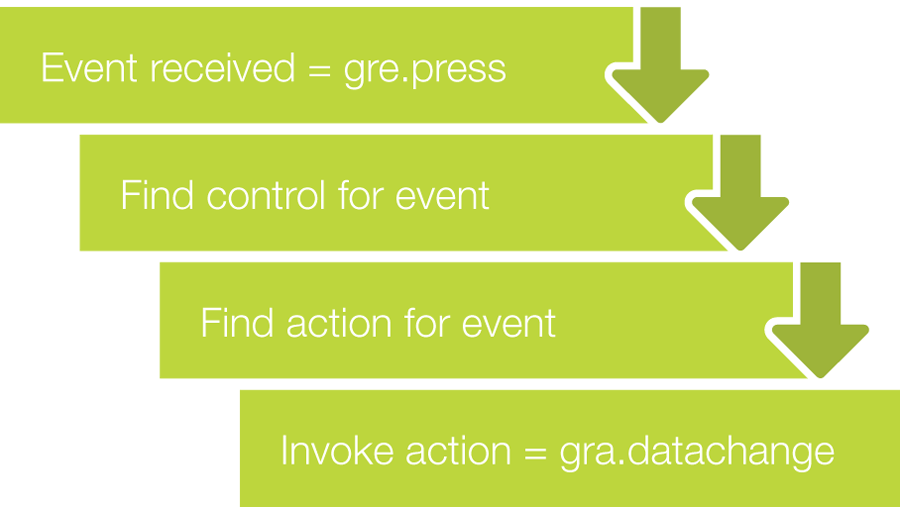
The following demonstrates how the a gre.press event
triggers a gra.datachange action:
For more information on the Storyboard Engine execution pipeline, refer to the Execution Pipeline section of this document.
Actions are extensible components in the Storyboard framework and are usually implemented as plugins to be included in the runtime environment. Plugins have the ability to hook into the Storyboard Engine managers and can provide a bridge between a Storyboard operation and the embedded system outside of the application.
A complete list of standard actions can be found in the Action Definitions section of this document.
All dynamic content and variables in Storyboard are maintained in an application database by the Storyboard Engine data manager. The data manager provides centralized notification when data changes to registered clients within the Storyboard framework.
The data manager stores entries as key/value pairs where the key is a fully qualified model path (string) and the value is a set of bytes with a corresponding format string describing how the data payload should be interpreted.
The Storyboard model is hierarchical, so the construction of a fully
qualified model path is straightforward process of joining model element
name segments with a . (dot) in between them. The following
list demonstrates how the fully qualified model name is formed for a
variable, varname, associated with different contexts in the
model.
varnameThis identifies a variable,
varname, as being an application level variablescreen_name.varnameThis identifies a variable,
varname, as being associated with the screenscreen_namelayer_name.varnameThis identifies a variable,
varname, as being associated with the layerlayer_namescreen_name.layer_name.varnameThis identifies a variable,
varname, as being associated with the layer instancelayer_nameassociated with the screenscreen_nameMost variables are not defined as layer instance variables, but rather as layer variables.
layer_name.control_name.varnameThis identifies a variable,
varname, as being associated with the controlcontrol_namethat is located on the layerlayer_name.Groups variables can also be addressed in this same manner as groups are also children of layers. The variable,
layer_name.group_name.varnameidentifies a variablevarnamewithin the groupgroup_name.layer_name.group_name.control_name.varnameThis identifies a variable,
varname, as being associated with the controlcontrol_namethat is located in the groupgroup_nameon the layerlayer_name.
Note
There is some overlap in the Storyboard namespace that could lead to ambiguous resolution. To maintain a clear name resolution, layers and screens may not have the same names and within a container such as a layer or a group, all of the model element names must be unique. This restriction is enforced by Storyboard Designer.
Using the fully qualified model paths can be cumbersome and impose extra maintenance effort as a project evolves or changes. Storyboard defines several variable shortcuts that will expand their value based on the current model context in which they are being resolved.
${app:varname}Refers to the application variable
varname.${screen:varname}Refers to the current screen's variable
varname${layer:varname}Refers to the current layer's variable
varname${group:varname}Refers to the current group's variable
varname${control:varname}Refers to the current control's variable
varname
For example, assuming a Storyboard model of:
Application
+ MainScreen
+ FirstLayer
+ AGroup
+ AControl
+ SecondLayer
+ AnotherControl
where
the current focus is associated with the control AControl, then
a reference to a variable varname would resolve to a fully
qualified path as follows:
${app:varname}varname${screen:varname}MainScreen.varname${layer:varname}FirstLayer.varname${group:varname}FirstLayer.AGroup.AControl.varname${control:varname}FirstLayer.AGroup.AControl.varname
Often these variables are used within render extensions and actions to
define access to a dynamic value that will be adjusted at runtime.
Alternatively, application variables can be used to provide an
application-wide setting for a particular value. For example, if all text
render extensions associated their font names with an application variable
${app:heading}, then changing the value of the
heading variable would change all the fonts in the
application.
Valid data variables and control/layer/screen names must follow the following rules:
A valid name matches the following [a-zA-Z]+[a-zA-Z0-9_]*
Starts with a character a-z/A-Z not a digit or special character
Only '_' is supported as a special character, no spaces in names
Screens and layers must be uniquely named from one another
Controls and groups must have unique names within their parent container
Declared variables on an container model element (such as a layer or a group) cannot collide with the name of any of the child model elements of that container (such as a control or group)
The prefix of
grdis reserved for Storyboard internal variablesThe character
.(dot) is reserved as a namespace separator
Layers, groups and controls can be manipulated at runtime by modifying
their internal data variables. These variables are created automatically for each
layer, control and group in the model and do not have to be created by users.
These variables use the reserved grd_ variable namespace.
These variables are generally accessed using
${model_object:varname}, for example
${control:grd_x} to indicate the x position of the current control
The following values can be queried and changed through the normal data management channels. The position variables are relative to the screen.
grd_x(format = 4s1)The layer instance's x position relative to the screen
grd_y(format = 4s1)The layer instance's y position relative to the screen
grd_xoffset(format = 4s1)The x pixel offset that will be used to determine the origin of the layer instance
grd_yoffset(format = 4s1)The y pixel offset that will be used to determine the origin of the layer instance
grd_width(format = 4s1)The layer's width
Note
Any change to this value affects all layers.
grd_height(format = 4s1)The layer's height
Note
Any change to this value affects all layers.
grd_alpha(format = 1u1)The layer's transparency value. The values range from 255 (opaque) to 0 (transparent)
grd_hidden(format = 1u1)The layer's visibility. A value of 0 states that the layer and all of its controls are visible and a value of 1 hides the layer and all of its controls
The following values can be queried and changed through the normal data management channels.
grd_x(format = 4s1)The group's x position relative to its layer
grd_y(format = 4s1)The group's y position relative to its layer
grd_hidden(format = lu1)The group's visibility. A value of 0 indicates that the control is visible and 1 that it is hidden
The following values can be queried and changed through the normal data management channels.
grd_x(format = 4s1)The control's x position relative to its layer
grd_y(format = 4s1)The control's y position relative to its layer
grd_width(format = 4s1)The control's width
grd_height(format = 4s1)The control's height
grd_zindex(format = 4s1)The control's z-index position. This sets the stacking order of controls within it's layer where 0 is at the back (furthest from the eye).
grd_hidden(format = 1u1)The control's visibility. A value of 0 indicates that the control is visible and 1 that it is hidden
grd_active(format = 1u1)A value of 1 states that the control is active (can receive and react to events) and 0 for an inactive control (cannot receive or react to events)
grd_opaque(format = 1u1)Indicates if the control is opaque to events. If opaque (1), the control will block events from being handled by other controls. If the value is 0, the events flow through the control to ones behind it.
grd_findex(format = 4s1)The control's focus index. This sets the focus on a control in a navigation sequence, where 1 sets the focus on the first control, 2 sets the second, etc.
A table contains all of the control variables and also a set of
table specific variables. These table specific variables can be
queried but not dynamically changed. In order to change these values
in a table, actions are provided: gra.table.resize,
gra.table.scroll. The variables are as
follows.
grd_rows(format = 4s1)The number of rows in the table
grd_cols(format = 4s1)The number of columns in the table
grd_visible_rows(format = 4s1)The number of visible rows in the table
grd_visible_cols(format = 4s1)The number of visible columns in the table
grd_active_row(format = 4s1)The row index of the currently active cell
grd_active_col(format = 4s1)The column index of the currently active cell
grd_row(format = 4s1)The table’s current top left row
grd_col(format = 4s1)The table’s current top left column
grd_xoffset(format = 4s1)The x pixel offset that will be used to determine the origin of the 1,1 table cell
grd_yoffset(format = 4s1)The y pixel offset that will be used to determine the origin of the 1,1 table cell
In addition to providing a framework for defining the visual display of an application, the Engine framework contains a data manager that is responsible for maintaining the state information that controls the behaviour of the application, such as which screens to display and what content to render inside of a control. The Data Manager contains variables that are user-defined (string keys) and typed (string, integer etc), and can be readily modified.
Most often the Data Manager variables are modified by the application itself as it responds to events in the system. Events are asynchronous triggers, originating internally or externally to the Engine, that are in turn mapped to actions that perform work in the system.
Actions are where all of the real ‘execution’ is performed within an Engine. Actions are managed as extensions to the Engine and are flexible. Some of the built-in actions include changing content in the data manager, manipulating timers, logging messages or triggering additional events both inside and outside of the Storyboard framework.
Below is the execution pipeline that is associated with the internal execution of the Storyboard Engine.
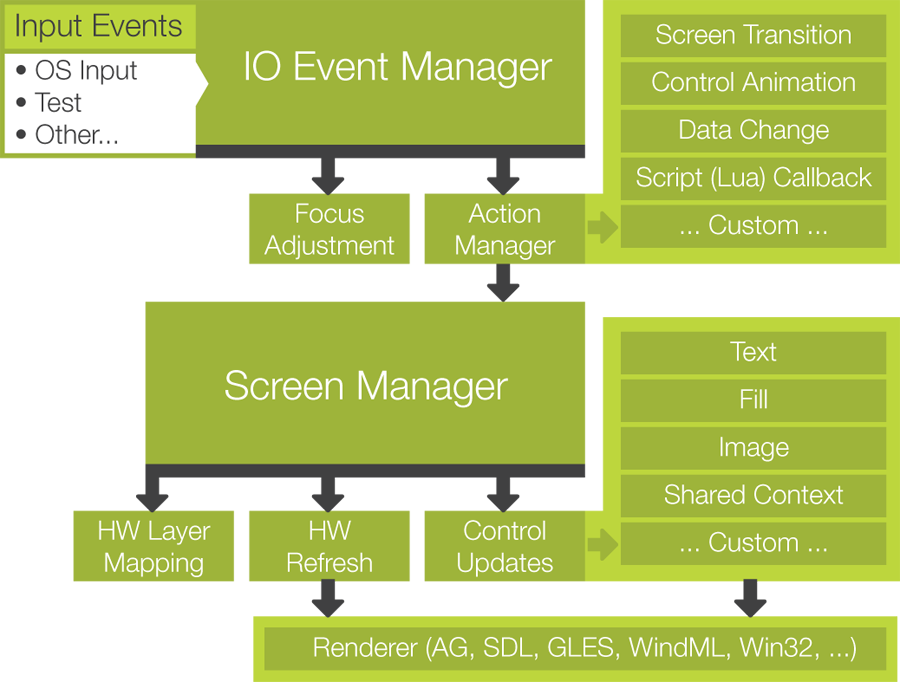
Execution begins with the arrival of an input event to the Storyboard Engine's IO Manager. That event is matched to all of the available actions that are in context by the Action Manager and executed in sequence. Changes in state will result in the a notification to the Screen Manager which will manage the update and refresh of the visual display by invoking the appropriate rendering modules based on the current context.
While the Engine defines a number of standard user interface types of events, there is no limit to the number of new events that can be created to control custom logic in an application. There can be multiple event input event sources concurrently generating events, however the events are queued. The delivery of the events, and potential execution of actions as a result, is serialized by the main application thread. This serialization is discussed further in the Execution Environment section of this document.
The application changes its internal state in response to events via actions bound to particular Storyboard model objects.
As an event is processed, it is matched against what events the action handlers available in a particular screen context are expecting. When there is a match between the received event and the expected event, the action handler is invoked. The action handler is invoked with arguments set in the deployment bundle, as well as the context of the invocation. The context includes the current screen, the current and focused controls as well as the event and its payload.
Multiple actions can be bound to a single event. These actions will be serially executed based on the order in which they were declared in the Design environment. The first declared action is the first action executed.
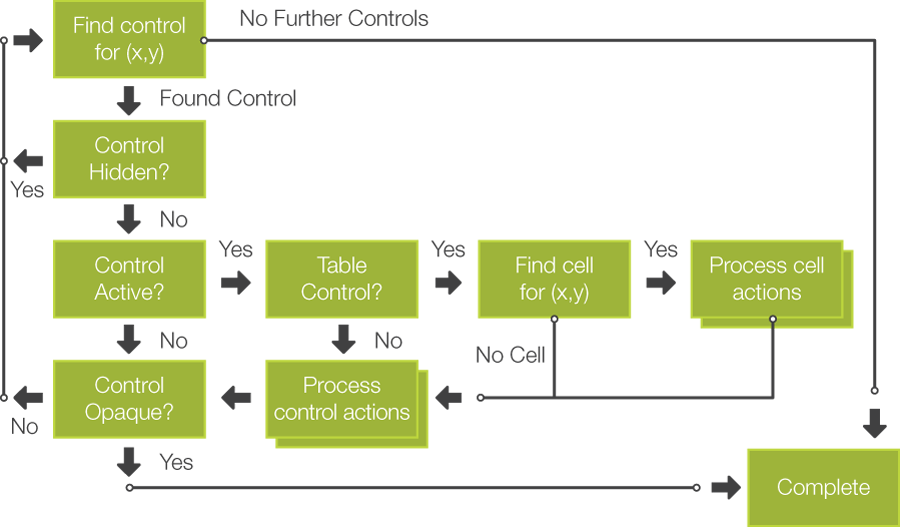
Actions can be declared on controls, layers, screens and applications. The event to action matching is performed first for controls based on screen display order (where applicable) and moves sequentially up the stack to process layer, screen, and the application actions. The execution of actions does not stop when one action handler is executed, with the exception that if a control is marked as opaque, then no additional controls will have their action handlers invoked . If an event is directed (an event which has a position) the only layer which this control is part of will have action handlers invoked, otherwise the actions for all layers will be invoked. Once control and layer actions have been invoked the following continues to the active screen and application context. The following diagram illustrates the affects of control flags on action handlers for a directed event (an event which has a position):
The following diagram illustrates the flow for an event which does not have positional information. These events may be targeted at a specific control or the focused control.
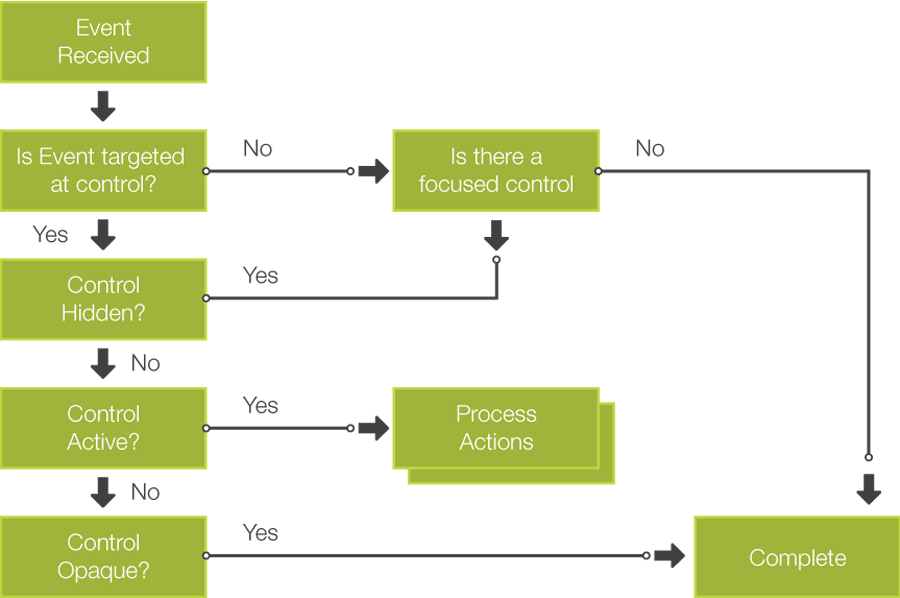
When an event is received the event is delivered to the currently focused control and this control's layer, and application. This is true for all events except for directed events such as mouse/touchscreen events which contain positional data.
The focus control for a screen is determined using the focus index value assigned to a control. A focus index is an integer value which places the control in the screen focus queue. A focus index must be unique across a screen. Focus can be navigated via the focus actions which allow for setting focus and moving through the focus queue (next/prev). The focus actions are described in more detail in the Action Definitions section of this document.
The data change is a meta-stage in the execution pipeline. It is one of many potential outcomes of executing an action handler in response to an event. However, since most actions cause a change of state, and most state information and variables are maintained in the data manager, this topic deserves special discussion.
The data manager provides clients with the ability to be notified of data content changes through data change listener callback functions. Since it is possible for multiple action handlers to be invoked as a result of a single event, these callback functions should be restricted to a bare minimum of functionality, otherwise they may introduce undesired delay to the graphical rendering operations.
Data change listener notification/processing occurs after all of the actions have been processed for a particular event, allowing data changes resulting from multiple actions to be more efficiently processed.
The display render action is also a meta-stage in the execution pipeline. As actions are executed, if any of these actions cause changes to data or state which is relevant to the rendering of content on the current screen, then the display will be refreshed with the updated content. If there is no change in data content that would affect the current screen, then there is no display update required.
A Storyboard application may be multi-threaded, however the execution pipeline is single threaded. This serialization is provided by the servicing of the event queue as each event is processed through the execution pipeline in sequence.
Internally, within the Engine framework, multiple threads are used to simplify control logic for things such as supporting multiple input sources, or timed event activities.
The threads that are run as part of the Storyboard framework are generally not signal handling, and mask off all signals. In certain situations there may be a requirement to handle specific signals, but in those situations the signal handling behaviour will be documented as part of the component API.
The Engine supports user defined animations using the animation
action, gra.animate. This action starts executing an
animation immediately, monitors the animation, and applies the specified
changes as they have been defined by the user in Designer.
An animation is a named block of operations that will perform changes on Storyboard data values at a pre-determined frame rate. The individual data changes that occur within an animation are referred to as animation steps.
An animation step contains the following information:
- key
The key is a reference to the data object that is going to be changed over the course of the animation. In general, keys are numeric items such as x or y position, width, height or transparency (alpha) values. However, it is possible with 0 duration animation steps to apply a change to any variable at a point in the animation. This includes text or images.
- offset
This is the time in milliseconds from the time that the animation was started that this particular change will start to occur.
- duration
This is the time in milliseconds over which the change will occur. This value may be 0 for changes that are not numeric (ie text or image values) or if the animation step is defined to occur at the start or end of the animation block.
- rate
For non-zero duration animation steps, this is the change curve that will be applied to the numeric value from its start value to the end value. Example rates include linear, ease in (easein), ease out (easeout), ease in out (easeinout) or bounce.
- starting value
This represents the starting value of the animation. The starting value can be either a specific value or variable reference, or it can be specified as the current value of the animation key at the time that the animation starts. Using the current value is good for animations that need to work generically to achieve some end value.
- end value
This represents the end value of the animation. The end value can be either a specific value or variable reference or it can be specified as an offset from the starting value rather than as an absolute value. Using an offset (or delta) in an animation makes it easy to perform incremental animations on objects.
Animation steps are all synchronized within an animation block so that their data changes will occur in a synchronized manner. While it is possible to specify arbitrary time offsets and durations, these values will be mapped onto the nearest synchronized frame slot. The frame slots are dictated by the frame rate of the animation block.
Animation instances can be labelled with a string id
which is an identifier used to provide exclusive excution. It is
possible for many animations to run concurrently, however if two
animations have the same id value, then only the last one
invoked will actually run. For example, if you have an animation to
shrink and grow a control, then you only want one of either the shrink
or grow operations to occur at one time. This can be achieved by having
the shrink and grow animation actions share the same identifier.
Animations may be stopped at any time by using the animation stop
action, gra.animate.stop.
Animations can also be created in the more traditional method of setting a timer and operating on data on every timer firing. By manipulating data in the timer callback, clients can cause any number of custom behaviours to occur, as the data changes on variables will automatically be reflected through to the user interface as would be done at any other time.
The timer callback allows non-traditional data change rates to be applied, as well as flip-book style animations where a sequence of images is pre-defined and changed on each timer iteration. This could be achieved through a series of 0 duration animations as of Storyboard 3.0.
Animations are frequently used during screen transitions. A screen transition is a way to move from the visible screen to a new screen which may or may not have common layers. By default, screen transitions can be invoked by using one of the following actions:
- gra.screen
Transition to a new screen immediately
- gra.screen.fade
Fade the new screen into the current screen over time
- gra.screen.path
Slide the new screen in and the old screen out over time, from one of the following directions
Left
Right
Top
Bottom
- gra.screen.scale
Grow the new screen over the current screen
All transition actions, which are time-based, take similar arguments that control the duration of the transition, the rate at which the transitions will occur, the orientation of the transition, and the number of frames that should be used. Using these arguments, the designer can control the user experience (i.e. duration and effects) as well as the overhead incurred on the system (frequency of frame updates).
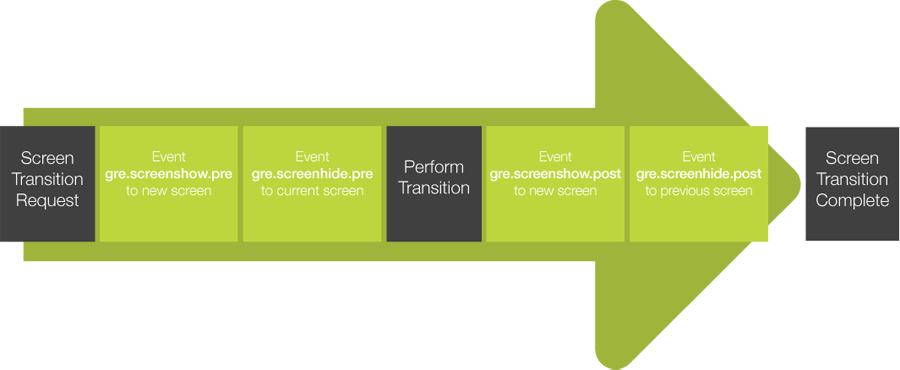
During a screen transition, four events will be generated to notify the system of the current state. These events are:
- gre.screenshow.pre
This event is generated for the new screen being shown. The event will be generated before the transition starts. This event gives the user a chance to change data via the gra.datachange action or Lua before ther transition content is updated.
- gre.screenhide.pre
This event is generated for the previous screen being hidden. The event will be generated before the transition starts.
- gre.screenshow.post
This event is generated for the new screen being shown. The event will be generated after the transition has completed.
- gre.screenhide.post
This event is generated for the previous screen being hidden. The event will be generated after the transition has completed.
The following illustrates the sequence of events:
The transitions are written such that if graphics hardware layer support is are available, then these layers, assuming they are available for use, will be leveraged to lower the processing overhead for the system during the transition period. Experience has demonstrated that it is possible to achieve smooth transitions at almost no CPU cost when the hardware capabilities can be properly leveraged.
The Storyboard action operation behaviour, based on events and actions, provides a limited amount of logic capabilities. When more sophisticated glue logic is needed to control behaviour, a scripting language can be used to interact with the Storyboard environment.
Scripting support is provided through action plugins and there are no limits to which languages may be used. The default scripting language that is provided with the Storyboard framework is Lua (www.lua.org).
Lua was selected for its small footprint, high performance, and its ability to be quickly integrated with custom extensions through a well-defined C module programming interface.
For more information about the Storyboard Lua integration, refer to the Scripting with Lua section of this document.
Communication with external processes in the embedded system can be accomplished in several ways. One approach that provides a strong API while maintaining a loose coupling for the implementation is to use Storyboard IO.
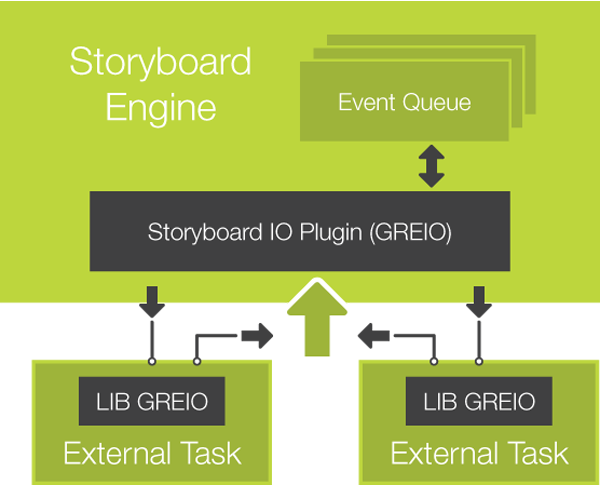
Storyboard IO, historically known as GREIO, is provided as a plugin for the Storyboard Engine, as well as a C API and library for external applications to use.
When the Storyboard IO plugin is loaded a channel is created in order for processes to inject events into the system. A single event queue is used to serialize the events and therefore any events sent via Storyboard IO will be placed in the queue with standard Storyboard system events. If the external application wishes to receive events, it can create its own Storyboard IO channel which can have events sent through. Applications can have multiple receive channels and the Engine has a single input channel. The following diagram illustrates an application which can send events to the Engine and review events on a named channel.
For more details about the client Storyboard IO API, refer to the Storyboard IO API section of this document. For more details about the Storyboard IO action, refer to the Action Definitions section of this document.
All actions are executed within the context of an event delivery and as such their execution will have an impact on the overall throughput and responsiveness of the system. In particular with Lua scripts, it is important to limit the length of time that functions take to perform their work or to separate lengthy operations into separate tasks, threads or processes depending on the operating environment being used.
The screen manager listens for data changes and checks the state of controls to determine when the display needs to be refreshed. If the data for controls is changing rapidly this may cause thrashing of the display and possible flicker if not using double buffering. When changing data values, moving controls, or generating events which would cause the display to be updated, it is advisable to hold the screen manager updates until all changes have been made. Once modifications are complete the screen manager can be released and the display updated is needed. The actions are as follows:
gra.screen.holdgra.screen.release